Run Actor and retrieve data via API
Learn how to run an Actor/task via the Apify API, wait for the job to finish, and retrieve its output data. Your key to integrating Actors with your projects.
The most popular way of integrating the Apify platform with an external project/application is by programmatically running an Actor or task, waiting for it to complete its run, then collecting its data and using it within the project. Follow this tutorial to have an idea on how to approach this, it isn't as complicated as it sounds!
Remember to check out our API documentation with examples in different languages and a live API console. We also recommend testing the API with a desktop client like Postman or Insomnia.
Apify API offers two ways of interacting with it:
If the Actor being run via API takes 5 minutes or less to complete a typical run, it should be called synchronously. Otherwise, (if a typical run takes longer than 5 minutes), it should be called asynchronously.
Run an Actor or task
If you are unsure about the differences between an Actor and a task, you can read about them in the tasks documentation. In brief, tasks are pre-configured inputs for Actors.
The API endpoints and usage (for both sync and async) for Actors and tasks are essentially the same.
To run, or call, an Actor/task, you will need a few things:
-
The name or ID of the Actor/task. The name looks like
username~actorNameorusername~taskName. The ID can be retrieved on the Settings page of the Actor/task. -
Your API token, which you can find on the Integrations page in Apify Console (do not share it with anyone!).
-
Possibly an input, which is passed in JSON format as the request's body.
-
Some other optional settings if you'd like to change the default values (such as allocated memory or the build).
The URL of POST request to run an Actor looks like this:
https://api.apify.com/v2/acts/ACTOR_NAME_OR_ID/runs?token=YOUR_TOKEN
For tasks, we can switch the path from acts to actor-tasks and keep the rest the same:
https://api.apify.com/v2/actor-tasks/TASK_NAME_OR_ID/runs?token=YOUR_TOKEN
If we send a correct POST request to one of these endpoints, the actor/actor-task will start just as if we had pressed the Start button on the Actor's page in the Apify Console.
Additional settings
We can also add settings for the Actor (which will override the default settings) as additional query parameters. For example, if we wanted to change how much memory the Actor's run should be allocated and which build to run, we could add the memory and build parameters separated by &.
https://api.apify.com/v2/acts/ACTOR_NAME_OR_ID/runs?token=YOUR_TOKEN&memory=8192&build=beta
This works in almost exactly the same way for both Actors and tasks; however, for tasks, there is no reason to specify a build parameter, as a task already has only one specific Actor build which cannot be changed with query parameters.
Input JSON
Most Actors would not be much use if input could not be passed into them to change their behavior. Additionally, even though tasks already have specified input configurations, it is handy to have the ability to overwrite task inputs through the body of the POST request.
The input can technically be any JSON object, and will vary depending on the Actor being run. Ensure that you are familiar with the Actor's input schema while writing the body of the request.
Good Actors have reasonable defaults for most input fields, so if you want to run one of the major Actors from Apify Store, you usually do not need to provide all possible fields.
Via API, let's quickly try to run Web Scraper, which is the most popular Actor on the Apify Store at the moment. The full input with all possible fields is pretty long and ugly, so we will not show it here. Because it has default values for most fields, we can provide a JSON input containing only the fields we'd like to customize. We will send a POST request to the endpoint below and add the JSON as the body of the request:
https://api.apify.com/v2/acts/apify~web-scraper/runs?token=YOUR_TOKEN
Here is how it looks in Postman:

If we press Send, it will immediately return some info about the run. The status will be either READY (which means that it is waiting to be allocated on a server) or RUNNING (99% of cases).
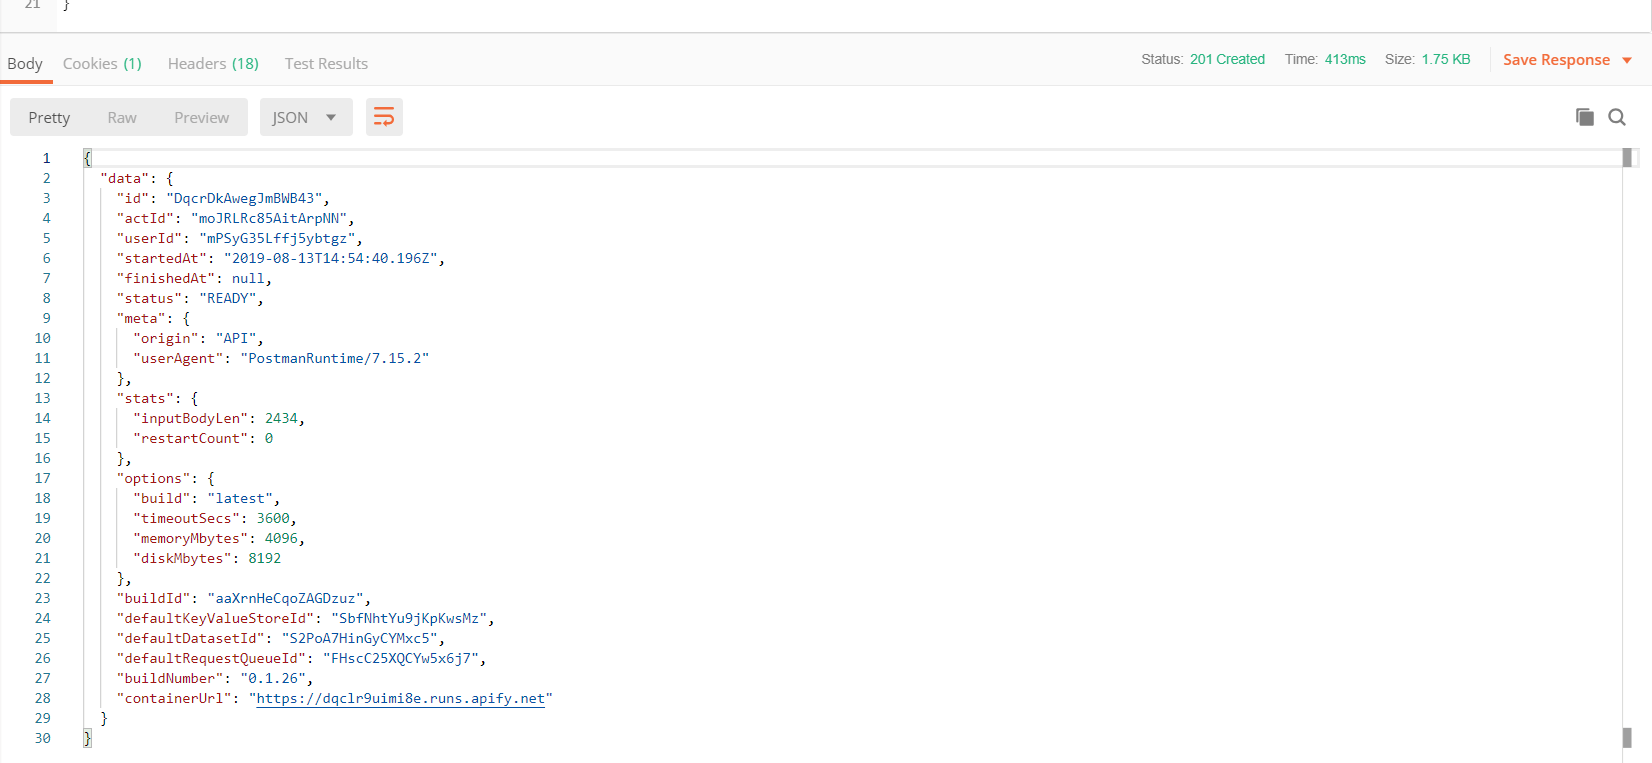
We will later use this run info JSON to retrieve the run's output data. This info about the run can also be retrieved with another call to the Get run endpoint.
JavaScript and Python client
If you are using JavaScript or Python, we highly recommend using the Apify API client (JavaScript, Python) instead of the raw HTTP API. The client implements smart polling and exponential backoff, which makes calling Actors and getting results efficient.
You can skip most of this tutorial by following this code example that calls Google Search Results Scraper and logs its results:
- Node.js
- Python
import { ApifyClient } from 'apify-client';

const client = new ApifyClient({ token: 'YOUR_API_TOKEN' });

const input = { queries: 'Food in NYC' };

// Run the Actor and wait for it to finish
// .call method waits infinitely long using smart polling
// Get back the run API object
const run = await client.actor('apify/google-search-scraper').call(input);

// Fetch and print Actor results from the run's dataset (if any)
const { items } = await client.dataset(run.defaultDatasetId).listItems();
items.forEach((item) => {
    console.dir(item);
});
from apify_client import ApifyClient
client = ApifyClient(token='YOUR_API_TOKEN')

run_input = {
    "queries": "Food in NYC",
}

# Run the Actor and wait for it to finish
# .call method waits infinitely long using smart polling
# Get back the run API object
run = client.actor("apify/google-search-scraper").call(run_input=run_input)

# Fetch and print Actor results from the run's dataset (if there are any)
for item in client.dataset(run["defaultDatasetId"]).iterate_items():
    print(item)
By using our client, you don't need to worry about choosing between synchronous or asynchronous flow. But if you don't want your code to wait during .call (potentially for hours), continue reading below about how to implement webhooks.
Synchronous flow
If each of your runs will last shorter than 5 minutes, you can use a single synchronous endpoint. When running synchronously, the connection will be held for up to 5 minutes.
If your synchronous run exceeds the 5-minute time limit, the response will be a run object containing information about the run and the status of RUNNING. If that happens, you need to restart the run asynchronously and wait for the run to finish.
Synchronous runs with dataset output
Most Actor runs will store their data in the default dataset. The Apify API provides run-sync-get-dataset-items endpoints for Actors and tasks, which allow you to run an Actor and receive the items from the default dataset once the run has finished.
Here is a Node.js example of calling a task via the API and logging the dataset items to the console:
// Use your favorite HTTP client
import got from 'got';

// Specify your API token
// (find it at https://console.apify.com/account#/integrations)
const myToken = '<YOUR_APIFY_TOKEN>';

// Start apify/google-search-scraper Actor
// and pass some queries into the JSON body
const response = await got({
    url: `https://api.apify.com/v2/acts/apify~google-search-scraper/run-sync-get-dataset-items?token=${myToken}`,
    method: 'POST',
    json: {
        queries: 'web scraping\nweb crawling',
    },
    responseType: 'json',
});

const items = response.body;

// Log each non-promoted search result for both queries
items.forEach((item) => {
    const { nonPromotedSearchResults } = item;
    nonPromotedSearchResults.forEach((result) => {
        const { title, url, description } = result;
        console.log(`${title}: ${url} --- ${description}`);
    });
});
Synchronous runs with key-value store output
Key-value stores are useful for storing files like images, HTML snapshots, or JSON data. The Apify API provides run-sync endpoints for Actors and tasks, which allow you to run a specific task and receive the output. By default, they return the OUTPUT record from the default key-value store.
For more detailed information, check the API reference.
Asynchronous flow
For runs longer than 5 minutes, the process consists of three steps:
Wait for the run to finish
There may be cases where we need to run the Actor and go away. But in any kind of integration, we are usually interested in its output. We have three basic options for how to wait for the actor/task to finish.
waitForFinish parameter
This solution is quite similar to the synchronous flow. To make the POST request wait, add the waitForFinish parameter. It can have a value from 0 to 60, which is the maximum time in seconds to wait (the max value for waitForFinish is 1 minute). Knowing this, we can extend the example URL like this:
https://api.apify.com/v2/acts/apify~web-scraper/runs?token=YOUR_TOKEN&waitForFinish=60
You can also use the waitForFinish parameter with the GET Run endpoint to implement a smarter polling system.
Once again, the final response will be the run info object; however, now its status should be SUCCEEDED or FAILED. If the run exceeds the waitForFinish duration, the status will still be RUNNING.
Webhooks
If you have a server, webhooks are the most elegant and flexible solution for integrations with Apify. You can set up a webhook for any Actor or task, and that webhook will send a POST request to your server after an event has occurred.
Usually, this event is a successfully finished run, but you can also set a different webhook for failed runs, etc.
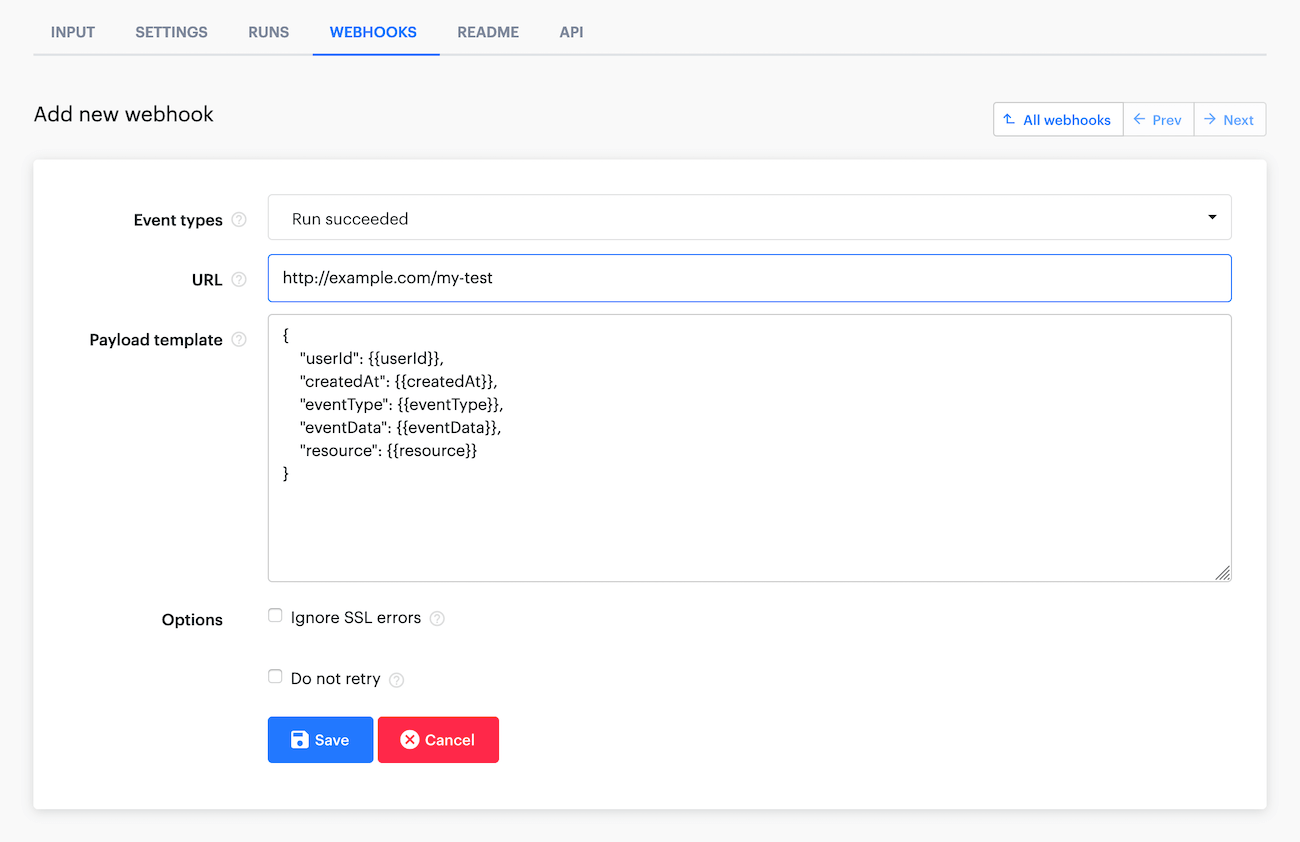
The webhook will send you a pretty complicated JSON object, but usually, you would only be interested in the resource object within the response, which is like the run info JSON from the previous sections. We can leave the payload template as is for our example since it is all we need.
Once your server receives this request from the webhook, you know that the event happened, and you can ask for the complete data.
Don't forget to respond to the webhook with a 200 status code! Otherwise, it will ping you again.
Polling
What if you don't have a server, and the run you'd like to do is much too long to use a synchronous call? In cases like these, periodic polling of the run's status is the solution.
When we run the Actor with the usual API call shown above, we will back a response with the run info object. From this JSON object, we can then extract the ID of the Actor run that we just started from the id field. Then, we can set an interval that will poll the Apify API (let's say every 5 seconds) by calling the Get run endpoint to retrieve the run's status.
Replace the RUN_ID in the following URL with the ID you extracted earlier:
https://api.apify.com/v2/acts/ACTOR_NAME_OR_ID/runs/RUN_ID
Once a status of SUCCEEDED or FAILED has been received, we know the run has finished and can cancel the interval and finally collect the data.
Collecting the data
Unless you used the synchronous call mentioned above, you will have to make one additional request to the API to retrieve the data.
The run info JSON also contains the IDs of the default dataset and key-value store that are allocated separately for each run, which is usually everything you need. The fields are called defaultDatasetId and defaultKeyValueStoreId.
Retrieving a dataset
If you are scraping products, or any list of items with similar fields, the dataset should be your storage of choice. Don't forget though, that dataset items are immutable. This means that you can only add to the dataset, and not change the content that is already inside it.
To retrieve the data from a dataset, send a GET request to the Get items endpoint and pass the defaultDatasetId into the URL. For a GET request to the default dataset, no token is needed.
https://api.apify.com/v2/datasets/DATASET_ID/items
By default, it will return the data in JSON format with some metadata. The actual data are in the items array.
You can use plenty of additional parameters, to learn more about them, visit our API reference documentation. We will only mention that you can pass a format parameter that transforms the response into popular formats like CSV, XML, Excel, RSS, etc.
The items are paginated, which means you can ask only for a subset of the data. Specify this using the limit and offset parameters. This endpoint has a limit of 250,000 items that it can return per request. To retrieve more, you will need to send more requests incrementing the offset parameter.
https://api.apify.com/v2/datasets/DATASET_ID/items?format=csv&offset=250000
Retrieving a key-value store
Key-value stores are mainly useful if you have a single output or any kind of files that cannot be stringified (such as images or PDFs).
When you want to retrieve something from a key-value store, the defaultKeyValueStoreId is not enough. You also need to know the name (or key) of the record you want to retrieve.
If you have a single output JSON, the convention is to return it as a record named OUTPUT to the default key-value store. To retrieve the record's content, call the Get record endpoint.
https://api.apify.com/v2/key-value-stores/STORE_ID/records/RECORD_KEY
If you don't know the keys (names) of the records in advance, you can retrieve just the keys with the List keys endpoint.
Keep in mind that you can get a maximum of 1000 keys per request, so you will need to paginate over the keys using the exclusiveStartKey parameter if you have more than 1000 keys. To do this, after each call, take the last record key and provide it as the exclusiveStartKey parameter. You can do this until you get 0 keys back.
https://api.apify.com/v2/key-value-stores/STORE_ID/keys?exclusiveStartKey=myLastRecordKey