Welcome to the getting started tutorial! It will walk you through creating your first scraping task step by step. You will learn how to set up all the different configuration options, code a Page function (pageFunction), and finally download the scraped data either as an Excel sheet or in another format, such as JSON or CSV. But first, let's give you a brief introduction to web scraping with Apify.
What is an Apify scraper
It doesn't matter whether you arrived here from Web Scraper (apify/web-scraper), Puppeteer Scraper (apify/puppeteer-scraper) or Cheerio Scraper (apify/cheerio-scraper). All of them are Actors and for now, let's think of an Actor as an application that you can use with your own configuration. apify/web-scraper is therefore an application called web-scraper, built by apify, that you can configure to scrape any webpage. We call these configurations tasks.
If you need help choosing the right scraper, see this great article. If you want to learn more about Actors in general, you can read our Actors page or browse the documentation.
You can create 10 different tasks for 10 different websites, with very different options, but there will always be just one Actor, the apify/*-scraper you chose. This is the essence of tasks. They are nothing but saved configurations of the Actor that you can run repeatedly.
Trying it out
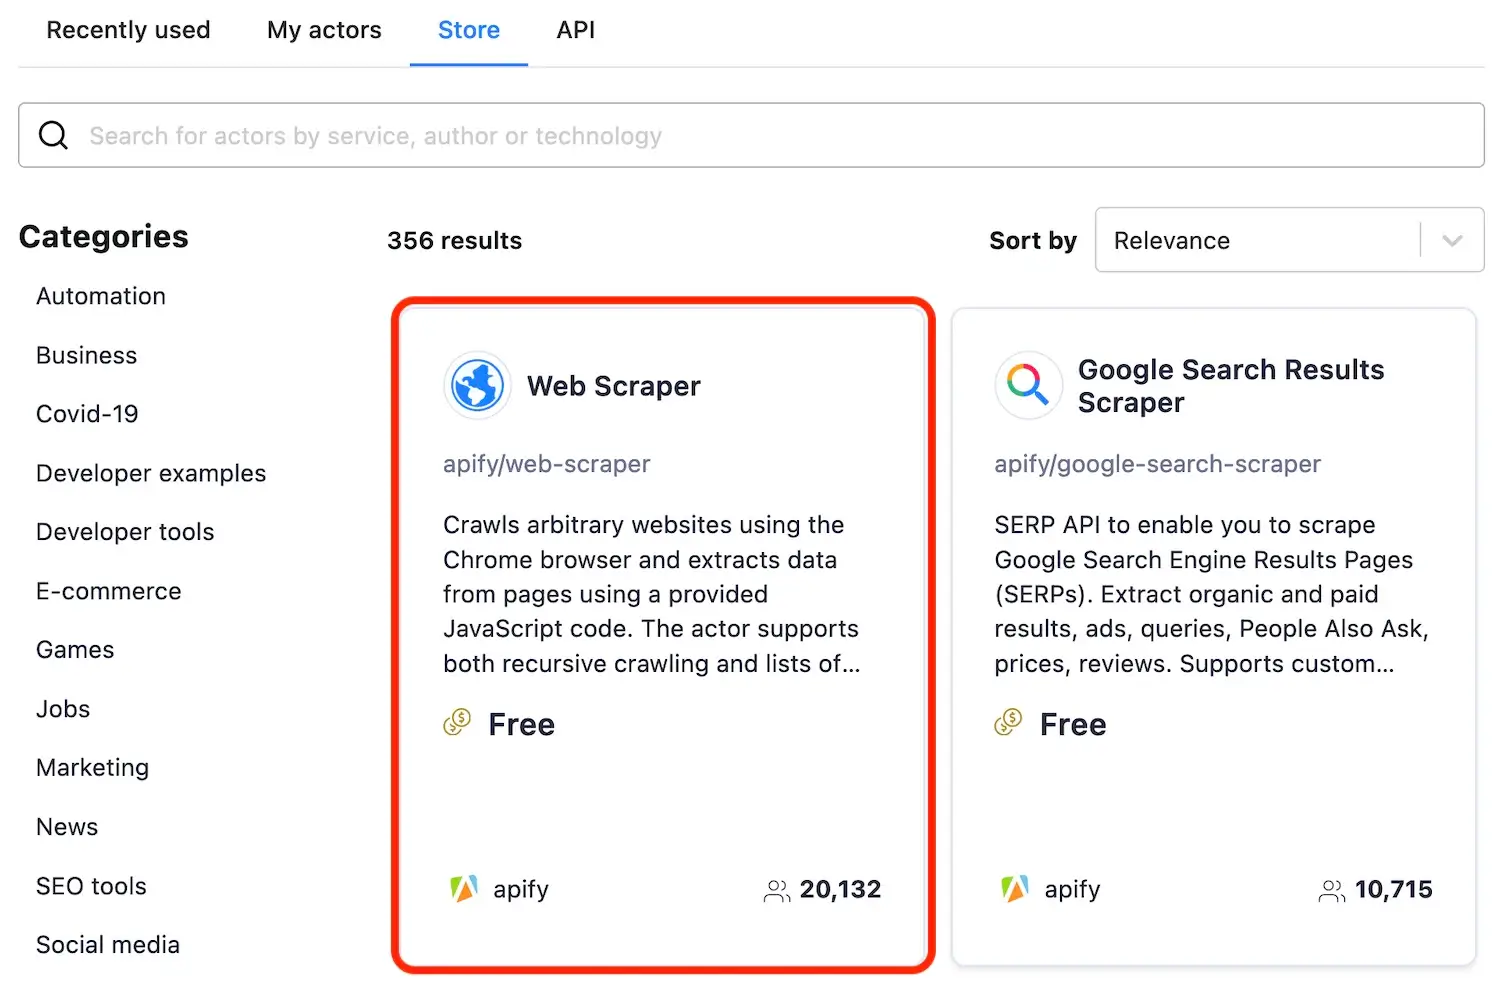
Depending on how you arrived at this tutorial, you may already have your first task created for the scraper of your choice. If not, the easiest way is to go to Apify Store and select the Actor you want to base your task on. Then, click the Create a new task button in the top-right corner.
This tutorial covers the use of Web, Cheerio, and Puppeteer scrapers, but a lot of the information here can be used with all Actors. For this tutorial, we will select Web Scraper.
Running a task
This takes you to the Input and options tab of the task configuration. Before we delve into the details, let's see how the example works. You can see that there are already some pre-configured input values. It says that the task should visit https://apify.com and all its subpages, such as https://apify.com/contact and scrape some data using the provided pageFunction, specifically the <title> of the page and its URL.
Scroll down to the Performance and limits section and set the Max pages per run option to 10. This tells your task to finish after 10 pages have been visited. We don't need to crawl the whole domain to see that the Actor works.
This also helps with keeping your compute unit (CU) consumption low. To get an idea, our free plan includes 10 CUs and this run will consume about 0.04 CU, so you can run it 250 times a month for free. If you accidentally go over the limit, no worries, we won't charge you for it. You just won't be able to run more tasks that month.
Now click Save & Run! (in the bottom-left part of your screen)
The run detail
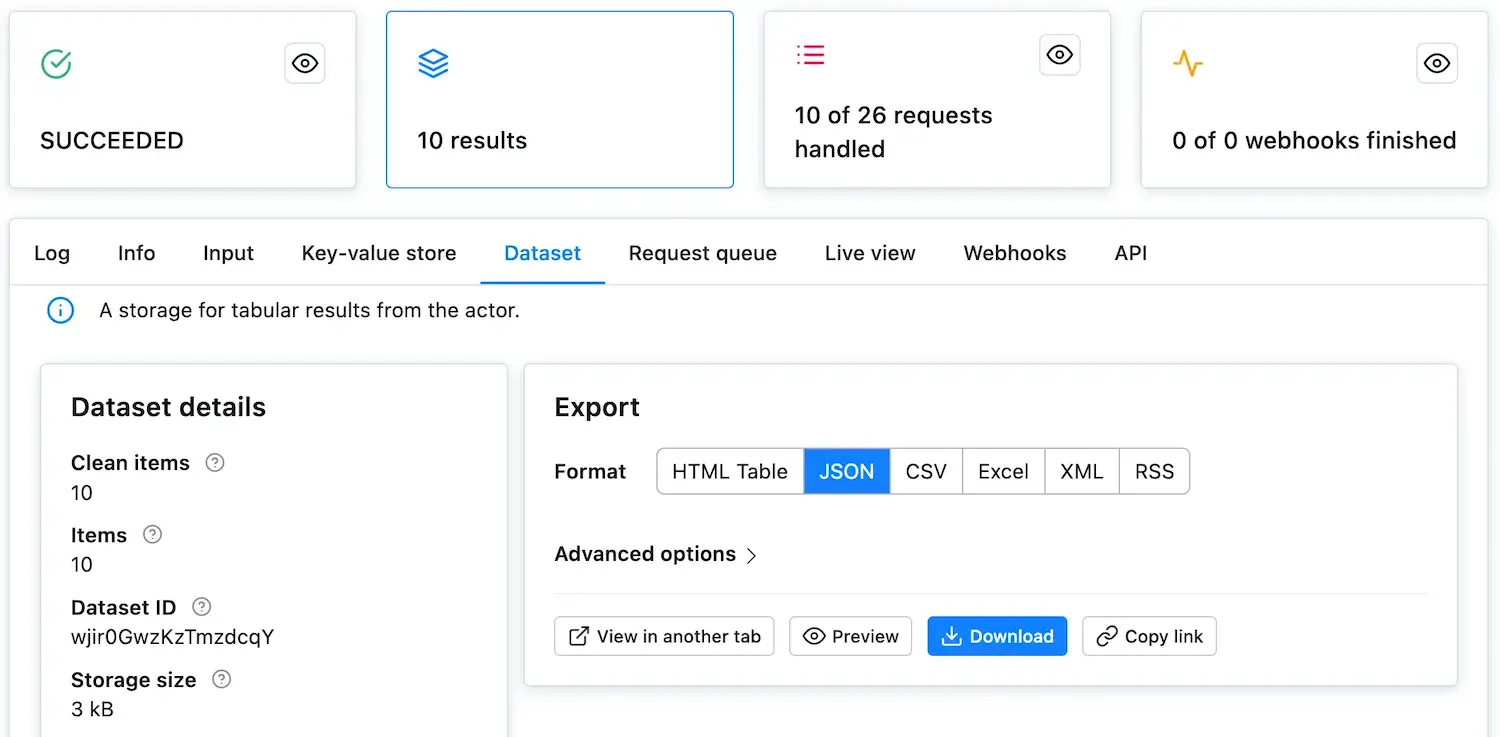
After clicking Save & Run, the window will change to the run detail. Here, you will see the run's log. If it seems that nothing is happening, don't worry, it takes a few seconds for the run to fully boot up. In under a minute, you should have the 10 pages scraped. You will know that the run successfully completed when the RUNNING card in top-left corner changes to SUCCEEDED.
Feel free to browse through the various new tabs: Log, Info, Input and other, but for the sake of brevity, we will not explain all their features in this tutorial.
Now that the run has SUCCEEDED, click on the glowing Results card to see the scrape's results. This takes you to the Dataset tab, where you can display or download the results in various formats. For now, click the Preview button. Voila, the scraped data!
Good job! We've run our first task and got some results. Let's learn how to change the default configuration to scrape something more interesting than the page's <title>.
Creating your own task
Before we jump into the scraping itself, let's have a quick look at the user interface that's available to us. Click on the task's name in the top-left corner to visit the task's configuration.

Input and options
The Input tab is where we started and it's the place where you create your scraping configuration. The Actor's creator prepares the Input form so that you can tell the Actor what to do. Feel free to check the tooltips of the various options to get a better idea of what they do. To display the tooltip, click the question mark next to each input field's name.
We will not go through all the available input options in this tutorial. See the Actor's README for detailed information.
Below the input fields are the Build, Timeout and Memory options. Let's keep them at default settings for now. Remember that if you see a yellow TIMED-OUT status after running your task, you might want to come back here and increase the timeout.
Timeouts are there to prevent tasks from running forever. Always set a reasonable timeout to prevent a rogue task from eating up all your compute units.
Settings
In the settings tab, you can set options that are common to all tasks and not directly related to the Actor's purpose. Unless you've already changed the task's name, it's set to my-task, so why not try changing it to my-first-scraper and clicking Save.
Runs
You can find all the task runs and their detail pages here. Every time you start a task, it will appear here in the list. Apify securely stores your ten most recent runs indefinitely, ensuring your records are always accessible. All of your task's runs and their outcomes, beyond the latest ten, will be stored here for the data retention period, which you can find under your plan.
Webhooks
Webhooks are a feature that help keep you aware of what's happening with your tasks. You can set them up to inform you when a task starts, finishes, fails etc., or you can even use them to run more tasks, depending on the outcome of the original one. See webhooks documentation.
Information
Since tasks are configurations for Actors, this tab shows you all the information about the underlying Actor, the Apify scraper of your choice. You can see the available versions and their READMEs - it's always a good idea to read an Actor's README first before creating a task for it.
API
The API tab gives you a quick overview of all the available API calls in case you would like to use your task programmatically. It also includes links to detailed API documentation. You can even try it out immediately using the Test endpoint button.
Never share a URL containing the authentication token (
?token=...parameter in the URLs), as this will compromise your account's security.
Scraping theory
Since this is a tutorial, we'll be scraping our own website. Apify Store is a great candidate for some scraping practice. It's a page built on popular technologies, which displays a lot of different items in various categories, just like an online store, a typical scraping target, would.
The goal
We want to create a scraper that scrapes all the Actors in the store and collects the following attributes for each Actor:
- URL - The URL that goes directly to the Actor's detail page.
- Unique identifier - Such as apify/web-scraper.
- Title - The title visible in the Actor's detail page.
- Description - The Actor's description.
- Last modification date - When the Actor was last modified.
- Number of runs - How many times the Actor was run.
Some of this information may be scraped directly from the listing pages, but for the rest, we will need to visit the detail pages of all the Actors.
The start URL
In the Input tab of the task we have, we'll change the Start URL from https://apify.com. This will tell the scraper to start by opening a different URL. You can add more Start URLs or even use a file with a list of thousands of them, but in this case, we'll be good with just one.
How do we choose the new Start URL? The goal is to scrape all Actors in the store, which is available at apify.com/store, so we choose this URL as our Start URL.
https://apify.com/store
We also need to somehow distinguish the Start URL from all the other URLs that the scraper will add later. To do this, click the Details button in the Start URL form and see the User data input. Here you can add any information you'll need during the scrape in a JSON format. For now, add a label to the Start URL.
{
  "label": "START"
}
Filtering with a Link selector
The Link selector, together with Pseudo URLs, are your URL matching arsenal. The Link selector is a CSS selector and its purpose is to select the HTML elements where the scraper should look for URLs. And by looking for URLs, we mean finding the elements' href attributes. For example, to enqueue URLs from <div class="my-class" href=...> tags, we would enter 'div.my-class'.
What's the connection to Pseudo URLs? Well, first, all the URLs found in the elements that match the Link selector are collected. Then, Pseudo URLs are used to filter through those URLs and enqueue only the ones that match the Pseudo URL structure.
To scrape all the Actors in Apify Store, we should use the Link selector to tell the scraper where to find the URLs we need. For now, let us tell you that the Link selector you're looking for is:
div.item > a
Save it as your Link selector. If you're wondering how we figured this out, follow along with the tutorial. By the time we finish, you'll know why we used this selector, too.
Crawling the website with pseudo URLs
What is a Pseudo URL? Let us explain. Before we can start scraping the Actor details, we need to find all the links to the details. If the links follow a set structure, we can use a certain pattern to describe this structure. And that's what a Pseudo URL is. A pattern that describes a URL structure. By setting a Pseudo URL, all links that follow the given structure will automatically be added to the crawling queue.
Let's see an example. To find the pattern, open some of the Actor details in the store. You'll find that the URLs are always structured the same:
https://apify.com/{OWNER}/{NAME}
In the structures, only the OWNER and NAME change. We can leverage this in a Pseudo URL.
Making a pseudo URL
Pseudo URLs are URLs with some variable parts in them. Those variable parts are represented by regular expressions enclosed in brackets [].
Working with our Actor details example, we could produce a Pseudo URL like this:
https://apify.com/[.+]/[.+]
This Pseudo URL will match all Actor detail pages, such as:
https://apify.com/apify/web-scraper
But it will not match pages we're not interested in, such as:
https://apify.com/contact
In addition, together with the filter we set up using the Link selector, the scraper will now avoid URLs such as:
https://apify.com/industries/manufacturing
This is because even though it matches our Pseudo URL's format, the HTML element that contains it does not match the div.item > a element we specified in the Link selector.
Let's use the above Pseudo URL in our task. We should also add a label as we did with our Start URL. This label will be added to all pages that were enqueued into the request queue using the given Pseudo URL.
{
  "label": "DETAIL"
}
Test run
Now that we've added some configuration, it's time to test it. Run the task, keeping the Max pages per run set to 10 and the pageFunction as it is. You should see in the log that the scraper first visits the Start URL and then several of the Actor details matching the Pseudo URL.
The page function
The pageFunction is a JavaScript function that gets executed for each page the scraper visits. To figure out how to create it, you must first inspect the page's structure to get an idea of its inner workings. The best tools for that are a browser's inbuilt developer tools - DevTools.
Using DevTools
Open Apify Store in the Chrome browser (or use any other browser, just note that the DevTools may differ slightly) and open the DevTools, either by right-clicking on the page and selecting Inspect or by pressing F12.
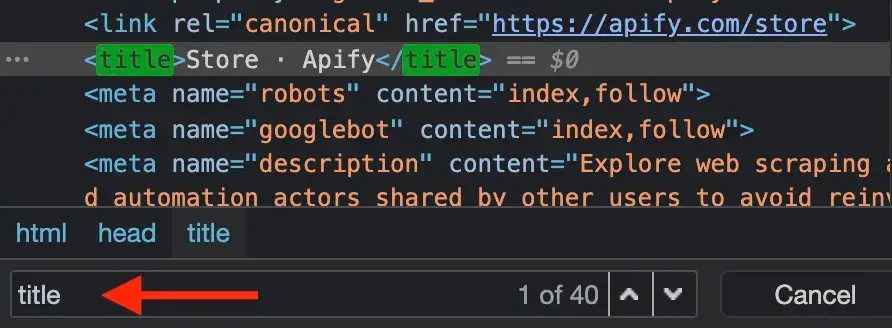
The DevTools window will pop up and display a lot of, perhaps unfamiliar, information. Don't worry about that too much - open the Elements tab (the one with the page's HTML). The Elements tab allows you to browse the page's structure and search within it using the search tool. You can open the search tool by pressing CTRL+F or CMD+F. Try typing title into the search bar.
You'll see that the Element tab jumps to the first <title> element of the current page and that the title is Store · Apify. It's always good practice to do your research using the DevTools before writing the pageFunction and running your task.
For the sake of brevity, we won't go into the details of using the DevTools in this tutorial. If you're just starting out with DevTools, this Google tutorial is a good place to begin.
Understanding context
The pageFunction has access to global variables such as window and document, which are provided by the browser, as well as to context, which is the pageFunction's single argument. context carries a lot of useful information and helpful functions, which are described in the Actor's README.
New page function boilerplate
We know that we'll visit two kinds of pages, the list page (Start URL) and the detail pages (enqueued using the Pseudo URL). We want to enqueue links on the list page and scrape data on the detail page.
Since we're not covering jQuery in this tutorial for the sake of brevity, replace the default boilerplate with the code below.
async function pageFunction(context) {
    const { request, log, skipLinks } = context;
    if (request.userData.label === 'START') {
        log.info('Store opened!');
        // Do some stuff later.
    }
    if (request.userData.label === 'DETAIL') {
        log.info(`Scraping ${request.url}`);
        await skipLinks();
        // Do some scraping.
        return {
            // Scraped data.
        };
    }
}
This may seem like a lot of new information, but it's all connected to our earlier configuration.
context.request
The request is an instance of the Request class and holds information about the currently processed page, such as its url. Each request also has the request.userData property of type Object. While configuring the Start URL and the Pseudo URL, we gave them a label. We're now using them in the pageFunction to distinguish between the store page and the detail pages.
context.skipLinks()
When a Pseudo URL is set, the scraper attempts to enqueue matching links on each page it visits. skipLinks() is used to tell the scraper that we don't want this to happen on the current page.
context.log
log is used for printing messages to the console. You may be tempted to use console.log(), but this will not work unless you turn on the Browser log option. log.info() should be used for general messages, but you can also use log.debug() for messages that will only be shown when you turn on the Debug log option. See the docs for more info.
The page function's return value
The pageFunction may only return nothing, null, Object or Object[]. If an Object is returned, it will be saved as a single result. Returning an Array of Objects will save each item in the array as a result.
The scraping results are saved in a dataset (one of the tabs in the run console, as you may remember). It behaves like a table. Each item is a row in the table and its properties are its columns. Returning the following Object:
async function pageFunction(context) {
    // ... rest of your code
    return {
        url: 'https://apify.com',
        title: 'Web Scraping, Data Extraction and Automation - Apify',
    };
}
will produce the following table:
| title | url |
|---|---|
| Web Scraping, Data Extraction and Automation - Apify | https://apify.com |
Scraper lifecycle
Now that we're familiar with all the pieces in the puzzle, we'll quickly take a look at the scraper lifecycle, or in other words, what the scraper actually does when it scrapes. It's quite straightforward.
The scraper:
- Visits the first Start URL and waits for the page to load.
- Executes the
pageFunction. - Finds all the elements matching the Link selector and extracts their
hrefattributes (URLs). - Uses the pseudo URLs to filter the extracted URLs and throws away those that don't match.
- Enqueues the matching URLs to the end of the crawling queue.
- Closes the page and selects a new URL to visit, either from the Start URLs if there are any left, or from the beginning of the crawling queue.
When you're not using the request queue, the scraper repeats steps 1 and 2. You would not use the request queue when you already know all the URLs you want to visit. For example, when you have a pre-existing list of a thousand URLs that you uploaded as a text file. Or when scraping a single URL.
Scraping practice
We've covered all the concepts that we need to understand to successfully scrape the data in our goal, so let's get to it. We will only output data that are already available to us in the page's URL. Remember from our goal that we also want to include the URL and a Unique identifier in our results. To get those, we need the request.url, because it is the URL and includes the Unique identifier.
const { url } = request;
const uniqueIdentifier = url.split('/').slice(-2).join('/');
Test run 2
We'll add our first data to the pageFunction and carry out a test run to see that everything works as expected.
async function pageFunction(context) {
    const { request, log, skipLinks } = context;
    if (request.userData.label === 'START') {
        log.info('Store opened!');
        // Do some stuff later.
    }
    if (request.userData.label === 'DETAIL') {
        const { url } = request;
        log.info(`Scraping ${url}`);
        await skipLinks();

        // Do some scraping.
        const uniqueIdentifier = url
            .split('/')
            .slice(-2)
            .join('/');

        return {
            url,
            uniqueIdentifier,
        };
    }
}
Now Save & Run the task and once it finishes, check the dataset by clicking on the Results card. Click Preview and you should see the URLs and unique identifiers scraped. Great job!
Choosing sides
Up until now, everything has been the same for all the Apify scrapers. Whether you're using Web Scraper, Puppeteer Scraper or Cheerio Scraper, what you've learned now will always be the same. This is great if you ever need to switch scrapers, because there's no need to learn everything from scratch.
Differences can be found in the code we use in the pageFunction. Often subtle, sometimes large.
In the next part of the tutorial, we'll focus on the individual scrapers' specific implementation details.
It's time to choose sides. But don't worry, at Apify, no side is the dark side.
Step-by-step tutorial that will help you get started with all Apify Scrapers. Learn the foundations of scraping the web with Apify and creating your own Actors.