Storage
The Apify platform provides three types of storage, accessible from Apify Console and externally through the REST API, API clients, and SDKs.
Storage types
Access your storage
Access your storage through Apify Console, the API, the API clients, or the SDKs.
Apify Console
To view your storages in Apify Console:
- Open the Storage section in the left-side menu.
- Select a tab to view your key-value stores, datasets, or request queues.
- Select a storage's ID to open its detail page.
To view the related API endpoints, select API in the top right corner.
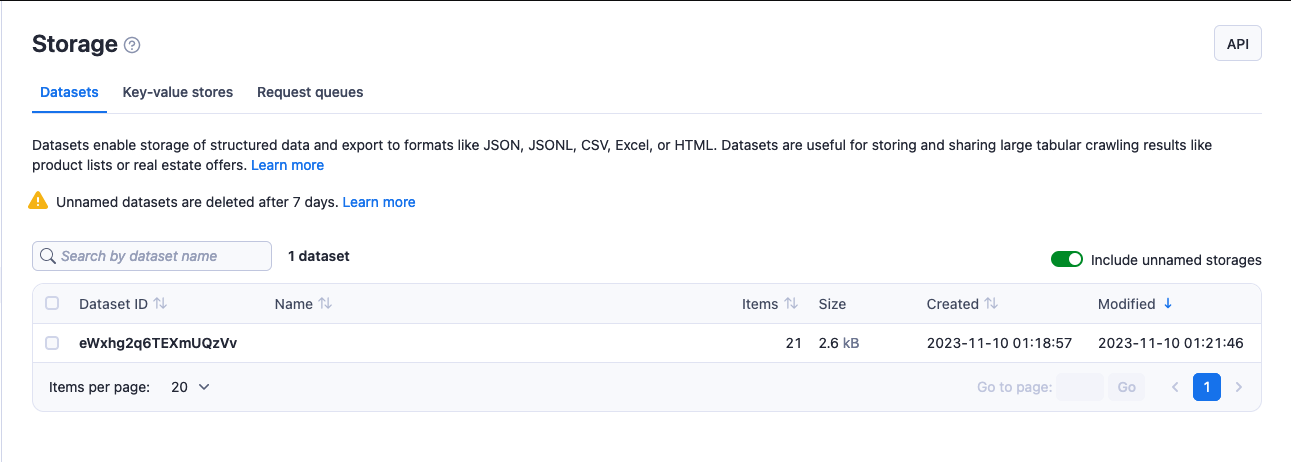
Use the Include unnamed storages checkbox to either display or hide unnamed storages. By default Apify Console displays them.
To rename a store, open the Actions menu and select Rename.
To share a storage, select Share in the Actions menu and provide an email, username, or user ID.
These URLs link to API endpoints where your data is stored. Read endpoints don't require an authentication token. Calls are authenticated by a hard-to-guess ID, which keeps sharing secure. Operations such as update or delete do require the token.
Never share a URL containing your authentication token. It can compromise your account's security. If the data you want to share requires a token, download it first and share it as a file.
Apify API
The Apify API lets you access your storages programmatically using HTTP requests and share your crawling results.
When accessing storages via API, provide a store ID in one of these formats:
WkzbQMuFYuamGv3YF- the store's alphanumerical ID if the store is unnamed.~store-name- the store's name prefixed with tilde (~) character if the store is named (e.g.~ecommerce-scraping-results)username~store-name- username and the store's name separated by a tilde (~) character if the store is named and belongs to a different account (e.g.janedoe~ecommerce-scraping-results). Note that in this case, the store's owner needs to grant you access first.
For read (GET) requests, the alphanumerical ID alone is enough, since it's hard to guess and serves as an authentication key.
For other request types, and when using username~store-name, provide your secret API token in the request's Authorization header or as a query parameter. Find your token on the API & Integrations page of your Apify account.
For a breakdown of each storage endpoint, see the API documentation.
Apify API clients
The Apify API clients let you access your storages from any Node.js or Python application, whether it runs on the Apify platform or externally.
For more details, see the API client docs.
Apify SDKs
The Apify SDKs are JavaScript and Python libraries for building your own Actors.
Named and unnamed storages
The default storages for an Actor run are unnamed, identified only by an ID. Naming a storage ensures indefinite retention regardless of plan; unnamed storages follow the data retention rules below.
Named and unnamed storages are identical except for their retention period. Named storages are easier to identify and confirm. The names janedoe~my-storage-1 and janedoe~web-scrape-results are easier to tell apart than the IDs cAbcYOfuXemTPwnIB and CAbcsuZbp7JHzkw1B. Storage names can be up to 63 characters long.
Name a storage
You can name a storage via Apify Console or through the API.
In Apify Console:
-
Open your run's details and select the Dataset, Key-value store, or Request queue tab as appropriate.
-
Find the store's ID:

-
Click the ID to open the storage details.
-
Click on the Actions menu and choose Rename.
-
Enter a new name. Your storage is now preserved indefinitely.
Via API: get the storage's ID from the run that generated it using the Get run endpoint, then rename it using the Update [storage] endpoint (for example, Update dataset).
The SDKs and clients each have their own naming conventions. See:
Data retention
How long Apify keeps your data depends on your plan. Unnamed storages and runs beyond the 10 most recent are deleted automatically; named storages are retained indefinitely.
- Free plan: Your 10 most recent runs are retained for 4 months.
- Paid plans: All data (including your 10 most recent runs) follows your plan's retention period, which you can configure in your billing settings.
- Named storages: Always exempt from deletion regardless of retention periods.
Unnamed storages beyond the 10 most recent runs are deleted when the retention period expires.
Estimate your costs
Use this tool to estimate storage costs by plan and storage type.
Estimate your storage costs
- Select a storage type.
- Choose a plan.
- Enter storage, duration, and operation counts.
- Review the estimated total and breakdown.
Storage Pricing
Estimate costs for your storage usage
Storage Type
Plan
Usage
Estimated Costs
Rate limiting
All API endpoints limit their request rate to protect Apify servers from overload. The default rate limit for storage objects is 60 requests per second. However, there are exceptions limited to 400 requests per second per storage object, including:
- Push items to dataset.
- CRUD (add, get, update, delete) operations of request queue requests.
If a client exceeds this limit, the API endpoints respond with the HTTP status code 429 Too Many Requests and the following body:
{
    "error": {
        "type": "rate-limit-exceeded",
        "message": "You have exceeded the rate limit of ... requests per second"
    }
}
Go to the API documentation for details and to learn what to do if you exceed the rate limit.
Share
You can grant access rights to other Apify users to view or modify your storages. Check the full list of permissions.
You can also share storages by link using their ID or name, depending on your account or resource-level general access setting. Learn how link-based access works in General resource access.
For one-off sharing when access is restricted, generate time-limited pre-signed URLs. See Sharing restricted resources with pre-signed URLs.
If your storage resource is set to restricted, all API calls must include a valid authentication token in the Authorization header. If you're using apify-client the header is passed in automatically.
Concurrent access
Storage can be accessed from any Actor or task run, provided you have its name or ID. Use the same methods and endpoints you'd use for the current run's storages.
Datasets and key-value stores support concurrent use. Multiple Actors or tasks can write to the same dataset or key-value store, and multiple runs can read from them at the same time.
Request queues, on the other hand, only allow multiple runs to add new data. A request queue can only be processed by one Actor or task run at any one time.
When multiple runs write to a storage simultaneously, the order of writes is not guaranteed. Data is written as each request is processed. The same applies in key-value stores and request queues: if a delete request precedes a read request for the same record, the read request fails.
If a storage resource access is set to Restricted, the run from which it's accessed must have explicit access to it. Learn how restricted access works in General resource access.
Delete storages
Named storages are only removed upon your request. You can delete storages in the following ways:
- Apify Console - using the Actions button in the store's detail page.
- JavaScript SDK - using the
.drop()method of the Dataset, Key-value store, or Request queue class. - Python SDK - using the
.drop()method of the Dataset, Key-value store, or Request queue class. - JavaScript API client - using the
.delete()method in the dataset, key-value store, or request queue clients. - Python API client - using the
.delete()method in the dataset, key-value store, or request queue clients. - API - using the
Delete [store]endpoint, where[store]is the storage type you want to delete.