GitHub integration
With the Apify integration for GitHub, you can create an Actor from a public or private repository, rebuild it automatically on every push, and trigger workflows in your repo when an Actor run fails, succeeds, or times out.
To run automated tests and multi-branch builds with GitHub Actions, see Continuous integration for Actors.
Create an Actor from a GitHub repository
During the Actor creation process, you can either let Apify create a repository or link an existing one.
Before you start
To use the GitHub integration, you need:
- An Apify account.
- A GitHub account with access to the repository you want to link, or permission to create repositories in the target organization.
Create a repository from a template
To create a repository from a template using Apify Console:
- Log in to Apify Console.
- In the left-side panel, go to Development > My Actors.
- Select Develop new, then Get started.
- Choose the project type, preferred language, and an Actor template.
- In the Where do you want to host your code? step, select GitHub. Follow the prompts on github.com to authorize Apify. You can grant access to your personal account, an organization, or specific repositories.
- Choose the organization that owns the new repository, enter a repository name, and select Create Actor.
Once done, Apify creates a private GitHub repository with the boilerplate code and links the Actor's source to that repository.
Link an existing repository
To link your new Actor with an existing GitHub repository:
-
Log in to Apify Console.
-
In the left-side panel, go to Development > My Actors.
-
Select Develop new, then Connect Git.
-
In the Select Git provider step, select GitHub. Follow the prompts on github.com to authorize Apify. You can grant access to your personal account, an organization, or specific repositories.
-
In the Pick a repo from GitHub step, choose the repository:
- To switch between authorized users and organizations, use the dropdown.
- To find a repository by name, use the Search field.
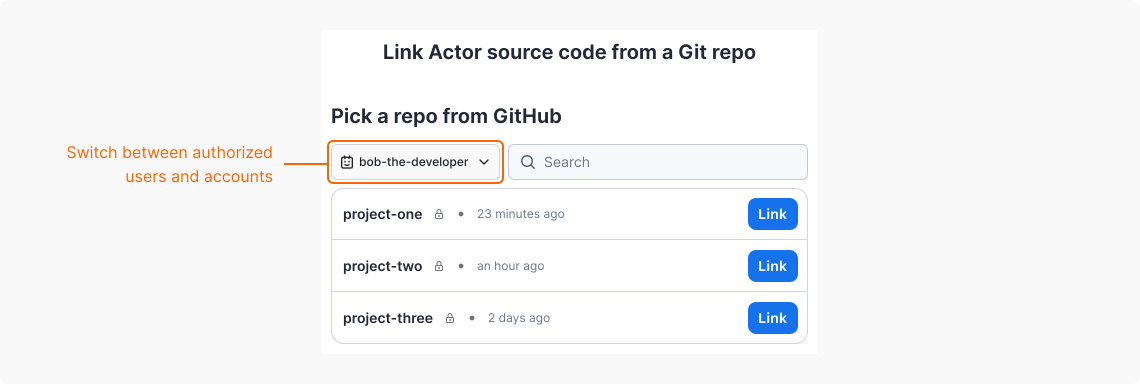
Apify creates the Actor as soon as you select a repository, then links its source to the repository, and uses the default branch. For how to switch to a different branch, see Git repository.
For private repositories, configure a deployment key so Apify can clone the code.
Build automatically on every push
When you create an Actor from a GitHub repository, Apify registers a push webhook on the repository. As a result, every push to the repository rebuilds your Actor.
For details and configuration options, see Automated builds.
Trigger builds with a webhook
There are cases when you can't use automated builds, for example:
- Your repository is on GitHub Enterprise Server.
- Your organization doesn't allow the Apify GitHub App.
In such situation, to build your Actor automatically on every push, manually add a webhook in GitHub that calls the Build Actor API endpoint:
-
In Apify Console, go to the Actor you want to configure.
-
Select API and from the dropdown, select API endpoints.
-
Copy the Build Actor endpoint URL in the following format:
https://api.apify.com/v2/actors/YOUR-ACTOR-NAME/builds?token=YOUR-TOKEN&version=0.0&tag=latest&waitForFinish=60API tokenSelect the correct API token in the dropdown before copying the URL.
-
In your GitHub repository, go to Settings > Webhooks > Add webhook.
-
Paste the endpoint URL into Payload URL and set Content type to
application/json. -
Save your changes.
Every push to the repository now triggers a build of the linked Actor version.
For automated tests and multi-branch workflows, such as separate latest and beta tags, see Continuous integration for Actors.
Create a GitHub issue when an Actor run fails
Use an Apify webhook to call the GitHub REST API and open an issue in your repository whenever an Actor run finishes with the FAILED status. This approach lets you triage failures in the same place you track other work.
Before you start
To automatically create issues when an Actor run fails, you need:
- An Apify Actor you can run.
- A GitHub repository where the issues are created.
- A GitHub fine-grained personal access token with Issues: Read and write permission scoped to the target repository.
1. Generate a GitHub personal access token
- In GitHub, open Settings > Developer settings > Personal access tokens > Fine-grained tokens and click Generate new token.
- Set Repository access to Only select repositories and pick the repository where you want issues to be created.
- Under Repository permissions, set Issues to Read and write.
- Generate the token and copy it. You'll paste it into the webhook headers in step 3.
Anyone with this token can create issues in the selected repository. Don't commit it or share it in screenshots.
2. Add a webhook on the Actor
-
In Apify Console, open the Actor and go to the Integrations tab.
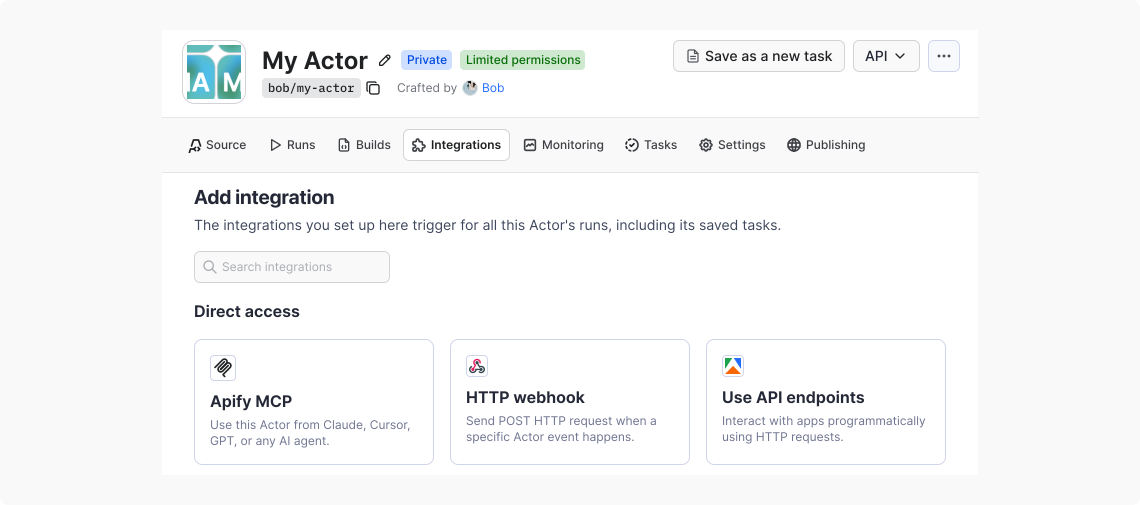
-
Under Connect with Apify, click HTTP webhook.
-
Configure the webhook:
- Event types: select
Run failed(ACTOR.RUN.FAILED). - URL:
https://api.github.com/repos/OWNER/REPO/issues, replacingOWNERandREPOwith your repository details.
- Event types: select
3. Set the headers and payload
In the same webhook form, configure the request that GitHub expects.
Set Headers template to authenticate with the personal access token and specify which GitHub API version to use:
{
    "Authorization": "Bearer YOUR_GITHUB_TOKEN",
    "Accept": "application/vnd.github+json",
    "X-GitHub-Api-Version": "2022-11-28"
}
Enable Interpolate variables in string fields, then set Payload template so the issue title and body include the failed run details:
{
    "title": "Actor run {{resource.id}} failed",
    "body": "Actor [{{resource.actId}}](https://console.apify.com/actors/{{resource.actId}}) finished with status `{{resource.status}}`.\n\nRun: https://console.apify.com/actors/{{resource.actId}}/runs/{{resource.id}}\nStarted: {{resource.startedAt}}\nFinished: {{resource.finishedAt}}\nExit code: {{resource.exitCode}}",
    "labels": ["actor-failure"]
}
For the full list of variables you can use, see Webhook actions.
4. Save and test the webhook
- Click Save to add the webhook.
- Click Test to send a sample payload to the GitHub API. Verify a new issue appears in the repository.
- Trigger a real failure (for example, run the Actor with input that you know will cause a failure) and confirm an issue is created.
If the test fails, check the webhook Dispatches log for the response from GitHub. Common causes are an expired token, missing repository permissions, or a typo in the repository path.
Resources
- Source types for Actors - Configure the Git URL, branch, and monorepo paths.
- Continuous integration for Actors - Run tests and trigger builds with GitHub Actions.
- Webhook events and actions - Reference for available events and the payload template.