ChatGPT integration
The ChatGPT integration enables you to connect ChatGPT to Apify's extensive library of Actors through the Model Context Protocol (MCP). This allows ChatGPT to access real-time web data and automation capabilities by using Apify tools directly in conversations. By default, the Apify MCP server exposes a set of tools that let you search and run any Actor you have access to, including all public Actors and rental Actors you have rented.
Example query: "Find and run an Actor that scrapes Instagram profiles and gets the profile of @natgeo"
In this tutorial, you'll learn how to connect ChatGPT to the Apify MCP server using a custom connector.
This integration uses a third-party service. If you find outdated content, please submit an issue on GitHub.
Prerequisites
Before connecting ChatGPT to Apify, you'll need:
- An Apify account - If you don't have an Apify account already, you can sign up
- Apify API token - Get your API token from the API & Integrations section in Apify Console. This token authorizes the MCP server to run Actors on your behalf. Make sure to keep it secure.
- An OpenAI account with access to ChatGPT - You need an OpenAI account to use ChatGPT.
- ChatGPT with Developer mode enabled - You must enable Developer Mode to add custom connectors (when the Developer mode is active, the message input box is outlined in orange).
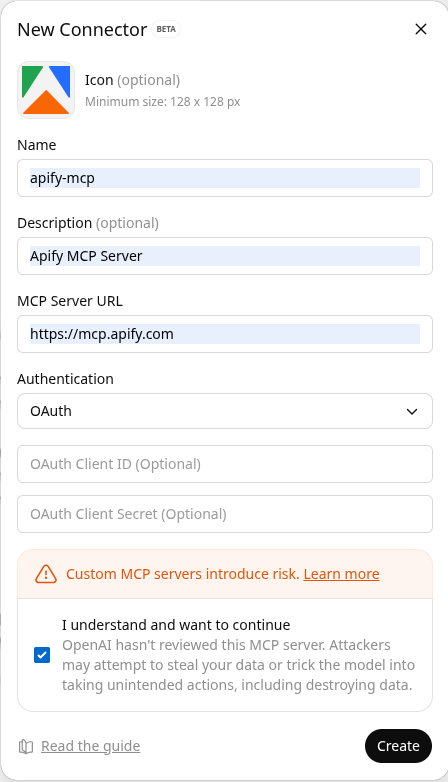
Create an MCP connector
-
In ChatGPT, go to Settings > Apps & Connectors > Create. If you don't see the Create button, enable Developer mode or reload the page.
-
Fill in the following fields:
- Name - a user-facing title, e.g.,
apify-mcp - Description - a short description of what the connector does
- MCP Server URL - choose one of the following:
https://mcp.apify.com- use the default set of Apify toolshttps://mcp.apify.com?tools=actors,docs,mtrunkat/url-list-download-html- use specific tools- Refer to mcp.apify.com for details
- Authentication - OAuth, you don’t need to provide a client ID or secret.
- Name - a user-facing title, e.g.,
-
Select Create to proceed to the authentication page. You’ll be redirected to the Apify website to authorize ChatGPT to access your Apify account.
Once authorized, you'll return to ChatGPT and see a success message with a list of tools available from the Apify MCP server.
ChatGPT does not allow modifying the selected tools after the connector is created. If you need to add or remove tools later, you'll need to create a new connector.
Try the MCP connector in ChatGPT
Once your connector is ready:
-
Open a new chat in ChatGPT.
-
Click the + button near the message composer and select More.
-
Choose your Apify MCP connector to add it to the conversation.
-
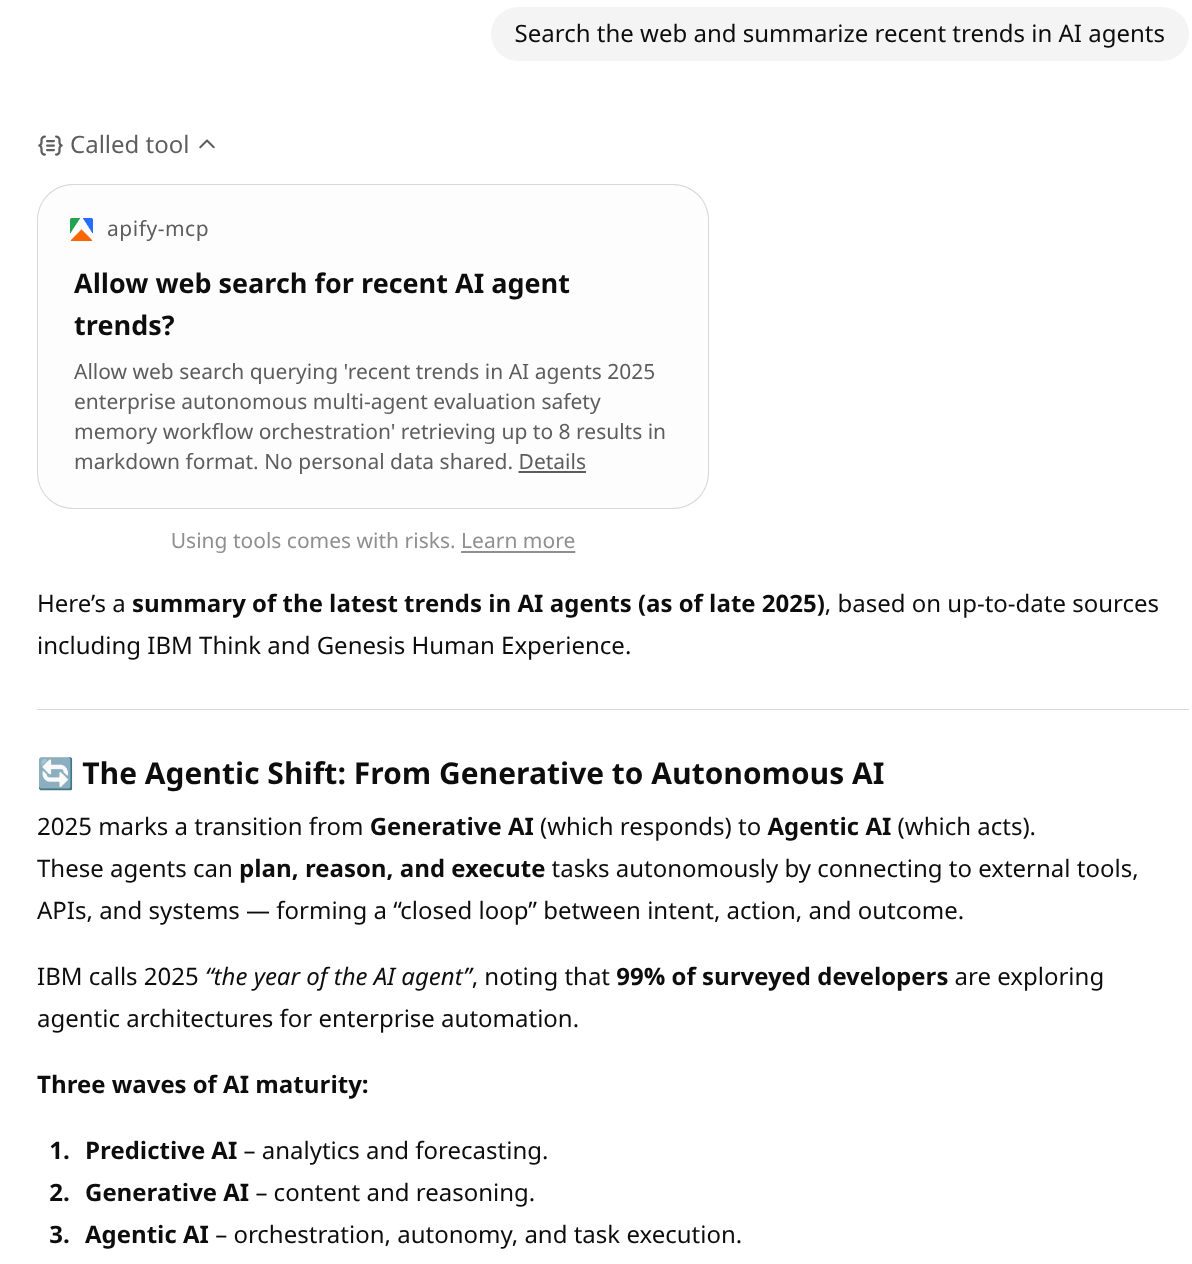
Ask ChatGPT to use Apify tools, for example:
“Search the web and summarize recent trends in AI agents”
You'll need to grant permission for each Apify tool when it's used for the first time. You should see ChatGPT calling Apify tools - such as the RAG Web Browser - to gather information.
Limitations
- MCP integration in ChatGPT is still in beta and may have some limitations or bugs.
- Tool selection and execution can be slow, especially with the latest GPT models.
- Custom connectors are only available in ChatGPT Developer mode.
- When creating connectors that include social media scrapers (Instagram, TikTok), OpenAI may display a Safety Scan warning indicating that some tools might fetch sensitive data.
Related integrations
- OpenAI Assistants integration - Use Apify Actors with OpenAI Assistants API via function calling
- OpenAI Agents SDK integration - Integrate Apify MCP server with OpenAI Agents SDK
Resources
- ChatGPT Developer mode - Learn how to enable Developer Mode in ChatGPT
- Connectors and MCP servers - Official OpenAI documentation on using MCP servers with ChatGPT
- Apify MCP server - Interactive configuration tool for the Apify MCP server
- Apify MCP documentation - Complete guide to using the Apify MCP server