Source code
Learn all about an Apify actor's code. Compare deployment options, create a custom Dockerfile, set environment variables and metamorph your actor.
The Source type setting determines the location of the source code for the actor. It can have one of the following values: Web IDE, Git repository, Zip file or GitHub Gist.
Web IDE
This option is used by default when your actor's source code is hosted on Apify platform. You can use our Web IDE to preview and update your actor's source code and browse its files and directories. This is especially helpful when you need to make fast updates to your source code or README, or when you want to directly test INPUT_SCHEMA.json on the Apify platform.
The only required file is Dockerfile, and all other files depend on your Dockerfile settings. By default, Apify's custom NodeJS Dockerfile is used, which requires a main.js file containing your source code and a package.json file containing package configurations for NPM.
See Custom Dockerfile and base Docker images for more information about creating your own Dockerfile and using Apify's prepared base images.
Git repository
If the actor's source code is hosted externally in a Git repository, it can consist of multiple files and directories, use its own Dockerfile to control the build process (see Custom Dockerfile for details) and have a user description in store fetched from the README.md file. The location of the repository is specified by the Git URL setting, which can be an https, git or ssh URL.
To help you get started quickly, you can use the apify/quick-start actor which contains all the boilerplate necessary when creating a new actor hosted on Git. The source code is available on GitHub.
To specify a Git branch or tag to check out, add a URL fragment to the URL. For example, to check out the develop branch, specify a URL such as https://github.com/jancurn/some-actor.git#develop
.
Optionally, the second part of the fragment in the Git URL (separated by a colon) specifies the directory from which the Actor will be built (and where the .actor
) folder is located. For example, https://github.com/jancurn/some-actor.git#develop:some/dir
will check out the develop branch and set some/dir as the root directory of the Actor. Note that you can easily set up an integration where the actor is automatically rebuilt on every commit to the Git repository. For more details, see GitHub integration.
Private repositories
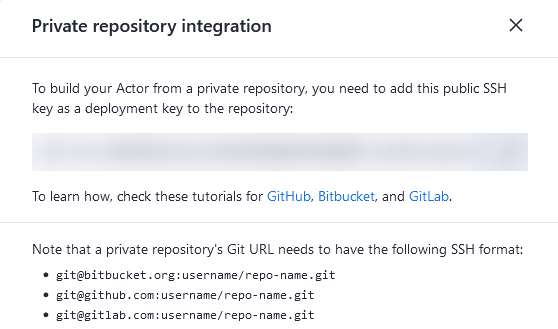
If your source code is hosted in a private Git repository then you need to configure deployment key. Deployment key is different for each actor and might be used only once at Git hosting of your choice (GitHub, Bitbucket, GitLab, etc.).
To obtain the key click at the deployment key link under the Git URL text input and follow the instructions there.
Actor monorepos
By default, the context directory for the Docker build is the directory pointed to by the Git URL (or the repository root if no directory is specified). If you want to use a different directory for the Docker context, you can use the dockerContextDir
property in the Actor definition. This is useful for example for sharing code between multiple actors in the same repository.
If you want to have multiple actors in a single repository that use shared code also located in the repository, you can set dockerContextDir
to the path to the folder which contains the actor's source and the shared code, and then copy both the actor's source and shared code to the Docker image in the Dockerfile.
An example actor monorepo is shown in the apify/actor-monorepo-example
repository. To build actors from this monorepo, you would set the source URL to https://github.com/apify/actor-monorepo-example#main:actor_1
and https://github.com/apify/actor-monorepo-example#main:actor_2
respectively.
Zip file
The source code for the actor can also be located in a Zip archive hosted on an external URL. This option enables integration with arbitrary source code or continuous integration systems. Similarly, as with the Git repository, the source code can consist of multiple files and directories, can contain a custom Dockerfile and the actor description is taken from README.md. If you don't use a custom Dockerfile, the root file of your application must be named main.js
.
GitHub Gist
Sometimes having a full Git repository or a hosted Zip file might be overly complicated for your small project, but you still want to have the source code in multiple files. In this case, you can simply put your source code into a GitHub Gist. For example:
https://gist.github.com/jancurn/2dbe83fea77c439b1119fb3f118513e7
Then set the Source Type to GitHub Gist and paste the Gist URL as follows:
Note that the example actor is available in the Apify Store as apify/example-github-gist.
Similarly, as with the Git repository, the source code can consist of multiple files and directories, it can contain a custom Dockerfile and the actor description is taken from README.md. If you don't use a custom Dockerfile, the root file of your application must be named main.js
.
Custom Dockerfile
Internally, Apify uses Docker to build and run actors. To control the build of the actor, you can create a custom Dockerfile and either reference from the dockerfile
field in the actor's config in .actor/actor.json, or store it in .actor/Dockerfile or Dockerfile in the actor's root directory. These three sites are searched for in this order of preference. If the Dockerfile is missing, the system uses the following default:
FROM apify/actor-node:16
COPY package*.json ./
RUN npm --quiet set progress=false \
&& npm install --only=prod --no-optional \
&& echo "Installed NPM packages:" \
&& (npm list --only=prod --no-optional --all || true) \
&& echo "Node.js version:" \
&& node --version \
&& echo "NPM version:" \
&& npm --version
COPY . ./
For more information about Dockerfile syntax and commands, see the Dockerfile reference.
Note that apify/actor-node
is a base Docker image provided by Apify. There are other base images with other features available. However, you can use arbitrary Docker images as the base for your actors, although using the Apify images has some performance advantages. See base Docker images for details.
By default, all Apify base Docker images with the Apify SDK and Crawlee start your Node.js application the same way as npm start does, i.e. by running the command specified in the package.json file under the scripts - start key. The default package.json file is similar to the following.
{
"description": "Anonymous actor on the Apify platform",
"version": "0.0.1",
"license": "UNLICENSED",
"main": "main.js",
"scripts": {
"start": "node main.js"
},
"dependencies": {
"apify": "^3.0.0",
"crawlee": "^3.0.0"
},
"repository": {}
}
This means that by default the system expects the source code to be in the main.js file. If you want to override this behavior, use a custom package.json and/or Dockerfile.
Automatic builds from GitHub
If the source code of an actor is hosted in a Git repository, it is possible to set up integration so that on every push to the Git repository the actor is automatically rebuilt. For that, you only need to set up a webhook in your Git source control system that will invoke the Build actor API endpoint on every push to Git repository.
For example, for repositories on GitHub it can be done using the following steps. First, go to the actor detail page, open the API tab and copy the Build actor API endpoint URL. It should look something like this:
https://api.apify.com/v2/acts/apify~hello-world/builds?token=<API_TOKEN>&version=0.1
Then go to your GitHub repository, click Settings, select Webhooks tab and click Add webhook. Paste the API URL to the Payload URL as follows:
And that's it! Now your actor should automatically rebuild on every push to the GitHub repository.
Custom environment variables
The actor owner can specify custom environment variables that are set to the actor's process during the run. Sensitive environment variables such as passwords or API tokens can be protected by setting the Secret option. With this option enabled, the value of the environment variable is encrypted and it will not be visible in the app or APIs. In addition, the value is redacted from actor logs to avoid the accidental leakage of sensitive data.
Note that the custom environment variables are fixed during the build of the actor and cannot be changed later. See the Builds section for details.
To access environment variables in Node.js, use the process.env
object, for example:
console.log(process.env.SMTP_HOST);
The actor runtime sets additional environment variables for the actor process during the run. See Environment variables for details.
The environment variables can also be used for the build process. In this case, the variables are treated as Docker build arguments. This means that they should not be used for secrets and, in order to access them in Dockerfile, you have to use the ARG variable_name
instruction.
Versioning
In order to enable active development, the actor can have multiple versions of the source code and associated settings, such as the Base image and Environment. Each version is denoted by a version number of the form MAJOR.MINOR
; the version numbers should adhere to the Semantic Versioning logic.
For example, the actor can have a production version 1.1, a beta version 1.2 that contains new features but is still backwards compatible, and a development version 2.0 that contains breaking changes.
The versions of the actors are built and run separately. For details, see Build and Running.
Local development
It is possible to develop actors locally on your computer and then only deploy them to the Apify cloud when they are ready. This is especially useful if you're using Git integration. See Git repository for more details. The boilerplate for creating an actor in a Git repository is available on GitHub.
Unfortunately, not all features of the Apify platform can be emulated locally, therefore you might still need to let the apify
NPM package use your API token in order to interact with the Apify platform. The simplest way to achieve that is by setting the APIFY_TOKEN
environment variable on your local development machine.
Input schema
Actor source files may contain an input schema defining the input that actor accepts and the UI components used for input at Apify platform. Using input schema you can provide UI to actor users that is easy to use and also ensure that input of your actor is valid.
For more information on this topic see input schema documentation on a separate page.
Metamorph
The metamorph operation transforms an actor run into a run of another actor with a new input. This feature is useful if you want to use another actor to finish the work of your current actor, instead of internally starting a new actor run and waiting for its finish. With metamorph, you can easily create new actors on top of existing ones, and give your users nicer input structure and user-interface for the final actor. For the users of your actors, the metamorph operation is completely transparent, they will just see your actor got the work done.
Internally, the system stops the Docker container corresponding to the actor run and starts a new container using a different Docker image. All the default storages are preserved and the new input is stored under the INPUT-METAMORPH-1 key in the same default key-value store.
To make you actor compatible with metamorph operation use Actor.getInput()
instead of Actor.getValue('INPUT')
. This method will fetch the input using the right key INPUT-METAMORPH-1 in a case of metamorphed run.
For example, imagine you have an actor that accepts a hotel URL on input and then internally uses the apify/web-scraper actor to scrape all the hotel reviews. The metamorphing code would look as follows:
import { Actor } from 'apify';
await Actor.init();
// Get input of your actor.
const { hotelUrl } = await Actor.getInput();
// Create input for apify/web-scraper
const newInput = {
startUrls: [{ url: hotelUrl }],
pageFunction: () => {
// Here you pass the page function that
// scrapes all the reviews ...
},
// ... and here would be all the additional
// input parameters.
};
// Transform the actor run to apify/web-scraper
// with the new input.
await Actor.metamorph('apify/web-scraper', newInput);
// The line here will never be reached, because the
// actor run will be interrupted.
await Actor.exit();