Claude.ai integration
Claude.ai is Anthropic's AI assistant in the browser. It answers questions, works with files, and calls external tools through connectors.
The Apify plugin connects Claude to Apify's library of Actors and bundles:
- The Apify MCP server for searching Apify Store, running Actors, and retrieving datasets through the Model Context Protocol (MCP).
- An
apifyrouting agent that picks the right tool or skill from a natural-language request. - Five built-in skills for common workflows (see Bundled skills below).
This guide covers setup in claude.ai in your browser. For the desktop app, see the Claude Desktop integration.
This integration uses a third-party service. If you find outdated content, please submit an issue on GitHub.
Prerequisites
- An Apify account - sign up for free if you don't have one.
- A Claude account - you need to be signed in.
Install the plugin
-
In claude.ai, open Customize, then select Connectors.
-
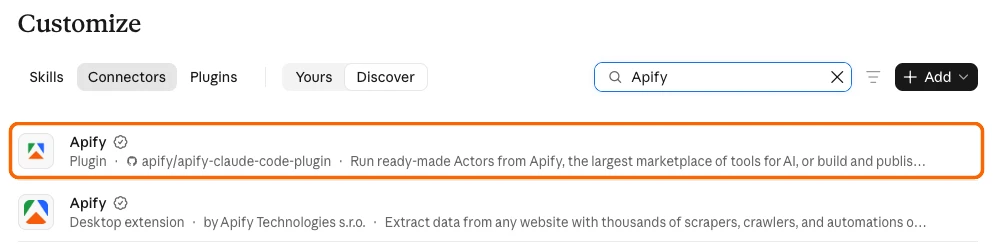
Select the Discover tab and search for "Apify".
-
Select the Apify entry labeled Plugin. The Apify entry labeled Desktop extension is for Claude Desktop only.
-
Select Add.
The plugin is now installed, but its Apify connector isn't connected yet. Connect it in the next section.
Authenticate to Apify
The plugin bundles the Apify MCP server as a connector. Connect it and sign in to Apify so Claude can run Actors and access your account data.
-
On the Apify plugin page, open the Connectors tab. The
apifyconnector shows as Not added. -
Select Connect. The Add custom connector dialog opens with the name and server URL already filled in.
-
Select Continue, keep the detected settings, and select Add. On the Apify sign-in page, choose the user or organization account Claude should use.
-
On the Claude asks for permission page, a warning says that the application was registered dynamically and wasn't verified by Apify. This warning is expected for Claude.
Check that the Apify account and the redirect URL
https://claude.ai/api/mcp/auth_callbackare correct, then select Allow access.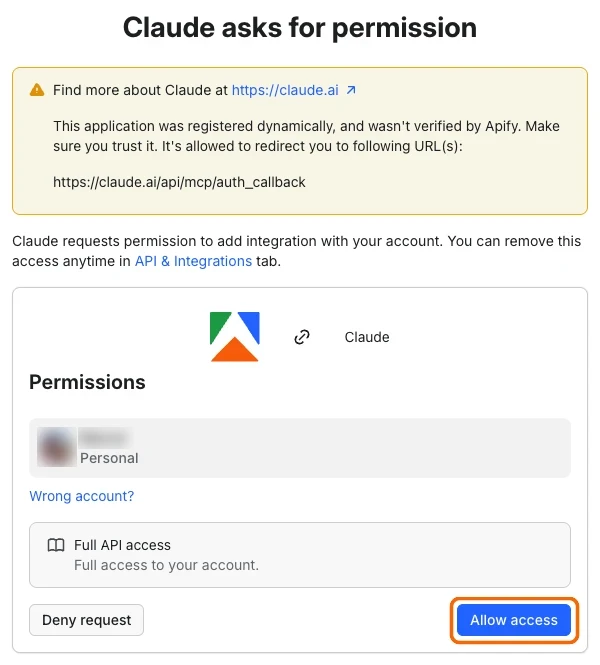
-
Back in claude.ai, check that the
apifyconnector shows as connected.
The connection stays authenticated for future chats. You can revoke access at any time in Apify Console > Settings > Integrations.
Run your first prompt
New chats have the Apify connector turned on by default. To turn it on or off for a chat, select + in the message box, select Connectors, and turn Apify on or off.
Describe what you want in natural language. You don't need to name Apify tools yourself.
Use Apify to find a good Actor for scraping Google Maps places. Show me the best option, its input requirements, pricing model, and what kind of dataset output it returns. Do not run the Actor yet.Claude searches Apify Store, fetches the top Actor's details through the Apify MCP server, and summarizes its inputs, pricing, and output - all without running the Actor.
Bundled skills
| Skill | Description |
|---|---|
apify-ultimate-scraper | Extraction using existing Actors for multi-step scraping and lead-generation workflows. |
apify-actor-development | Full Actor lifecycle - template selection, development, local testing, and deployment with apify push. |
apify-actorization | Converts existing JavaScript, TypeScript, Python, or CLI projects into Apify Actors. |
apify-generate-output-schema | Generates dataset and key-value store schemas for existing Actors. |
apify-sdk-integration | Integrates Actor execution into applications using the apify-client package. |
Example prompts that route to specific skills:
To run apify-ultimate-scraper:
Find 10 highly rated coffee shops in Seattle with name, address, rating, phone, and website.To run apify-actor-development:
Create an Apify Actor that accepts a `startUrl` and `maxPages` input, crawls the site, and stores each page title and URL.To run apify-sdk-integration:
Add Apify to this project. The Node.js API route should run an Actor and return dataset items as JSON.Connect without the plugin
To choose which Apify tools Claude can use, add the Apify MCP server as a custom connector instead of installing the plugin. This setup doesn't include the plugin's skills or routing agent. On Team and Enterprise plans, only an Owner or Primary Owner can add a custom connector, and they add it for the whole organization.
- Build your setup in the Apify MCP server configurator and copy the server URL it generates. To use the default tool set, use
https://mcp.apify.com. - In claude.ai, open Customize > Connectors, select Add, then select Add custom connector.
- Fill in the dialog:
- Name - A name for the connector, for example
Apify - MCP server URL - The server URL from step 1
- Name - A name for the connector, for example
- Select Continue, keep the detected settings, and select Add.
- Sign in to Apify and select Allow access, as described in Authenticate to Apify.
Claude doesn't let you edit a custom connector. To change the tools later, remove the connector and add it again with a new URL. For the full list of options, see tool selection.
Troubleshooting
The following sections cover common issues with the plugin and its Apify connector in claude.ai.
The Apify plugin doesn't appear in Discover
Make sure you're on the Connectors tab, then search for "Apify" in Discover. If the plugin is already installed, it appears in Plugins > Yours instead.
Apify tools don't run
Open Customize > Connectors and select the Yours tab. The apify connector should show a check mark in the Status column.
If apify isn't listed, or shows Connect, connect it as described in Authenticate to Apify. To reach the plugin page, open Customize > Plugins, select the Yours tab, and select the Apify plugin.
Also check that the chat has the connector turned on: select + in the message box, then Connectors. If tools still don't run, check the connector's tool permissions and make sure Apify tools are set to Always allow or Ask first, not blocked.
Authentication errors or wrong Apify account
Remove the apify connector and connect it again to trigger a new sign-in. On the Claude asks for permission page, use Wrong account? to pick the account Claude should use.
Limitations
- Long-running Actors may exceed the time a single tool call waits for completion. Reduce the scope or split the work across multiple prompts.
- Each Actor run consumes Apify platform usage from your plan in addition to any Claude usage. See Apify billing.
- Skills that build or deploy Actors need a local project. They work best in Claude Code.
Related integrations
- Claude Desktop integration - Connect the Apify MCP server to the Claude desktop app
- Claude Code CLI integration - Install the Apify plugin in Claude Code
- MCP server integration - Use the Apify MCP server with other clients
- ChatGPT integration - Connect the Apify MCP server to ChatGPT
Resources
- Anthropic: Get started with custom connectors using remote MCP - Official docs for connectors, including plan availability and organization setup
- Apify plugin for Claude - Source repository for the plugin
- Apify Store - Actors you can run from Claude