Developing a scraper with AI chat
In this lesson, we'll use ChatGPT and the Apify platform to create an app for tracking prices on an e-commerce website.
Want to extract data from a website? Even without knowing how to code, we can open ChatGPT and have a scraper ready. Let's say you want to track prices from this Sales page. You'd type something like:
Create a scraper in JavaScript which downloads https://warehouse-theme-metal.myshopify.com/collections/sales, extracts all the products in Sales and saves a CSV file, which contains:

- Product name
- Product detail page URL
- Price
Try it! The generated code will most likely work out of the box, but the resulting program will still have a few caveats. Some are usability issues:
- User-operated: We have to run the scraper ourselves. If we're tracking price trends, we need to remember to run it daily. If we want, for example, alerts for big discounts, manually running the program isn't much better than just checking the site in a browser every day.
- Manual data management: Tracking prices over time means figuring out how to organize the exported data ourselves. Processing the data could also be tricky, since different analysis tools often require different formats.
Some are technical challenges:
- No monitoring: Even if we knew how to set up a server or home installation to run our scraper regularly, we'd have little insight into whether it ran successfully, what errors or warnings occurred, how long it took, or what resources it used.
- Anti-scraping risks: If the target website detects our scraper, they can rate-limit or block us. Sure, we could run it from a coffee shop's Wi-Fi, but eventually they'd block that too, and we'd seriously annoy our barista.
To overcome these limitations, we'll use Apify, a platform where our scraper can run independently of our computer.
We use ChatGPT from OpenAI in this course only because it's the most widely used AI chat. Any similar tool, such as Google Gemini or Claude by Anthropic, will do.
Creating Apify account
First, let's create a new Apify account. The signup flow takes us through a few checks to confirm we're human and that our email is valid. It adds a few steps, but it's necessary to prevent abuse of the platform.
Once we have an active account, we can start working on our scraper. Using the platform's resources costs money, but worry not, everything we cover here fits within Apify's free tier.
Creating a new Actor
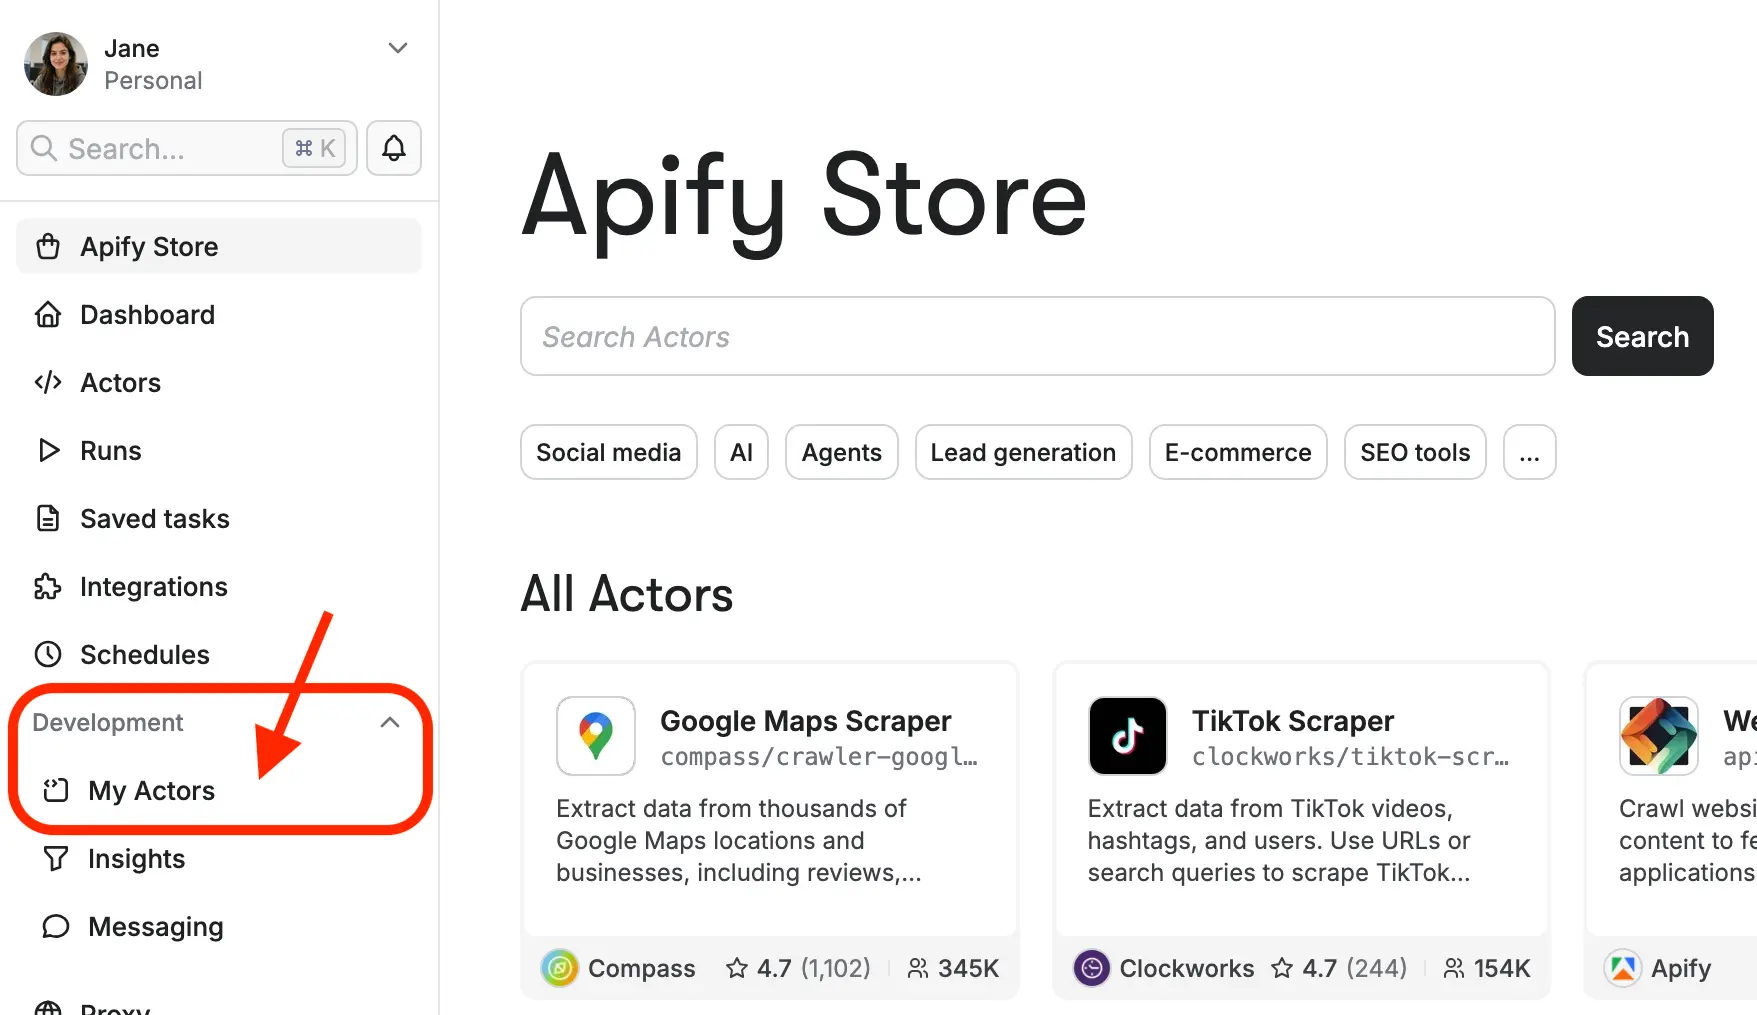
After logging in, we land on a page called Apify Store. Apify serves as both infrastructure where we can privately deploy and run our own scrapers, and as a marketplace where anyone can offer ready-made scrapers to others for rent. But let's hold off on exploring Apify Store for now. We'll navigate to My Actors under the Development menu:
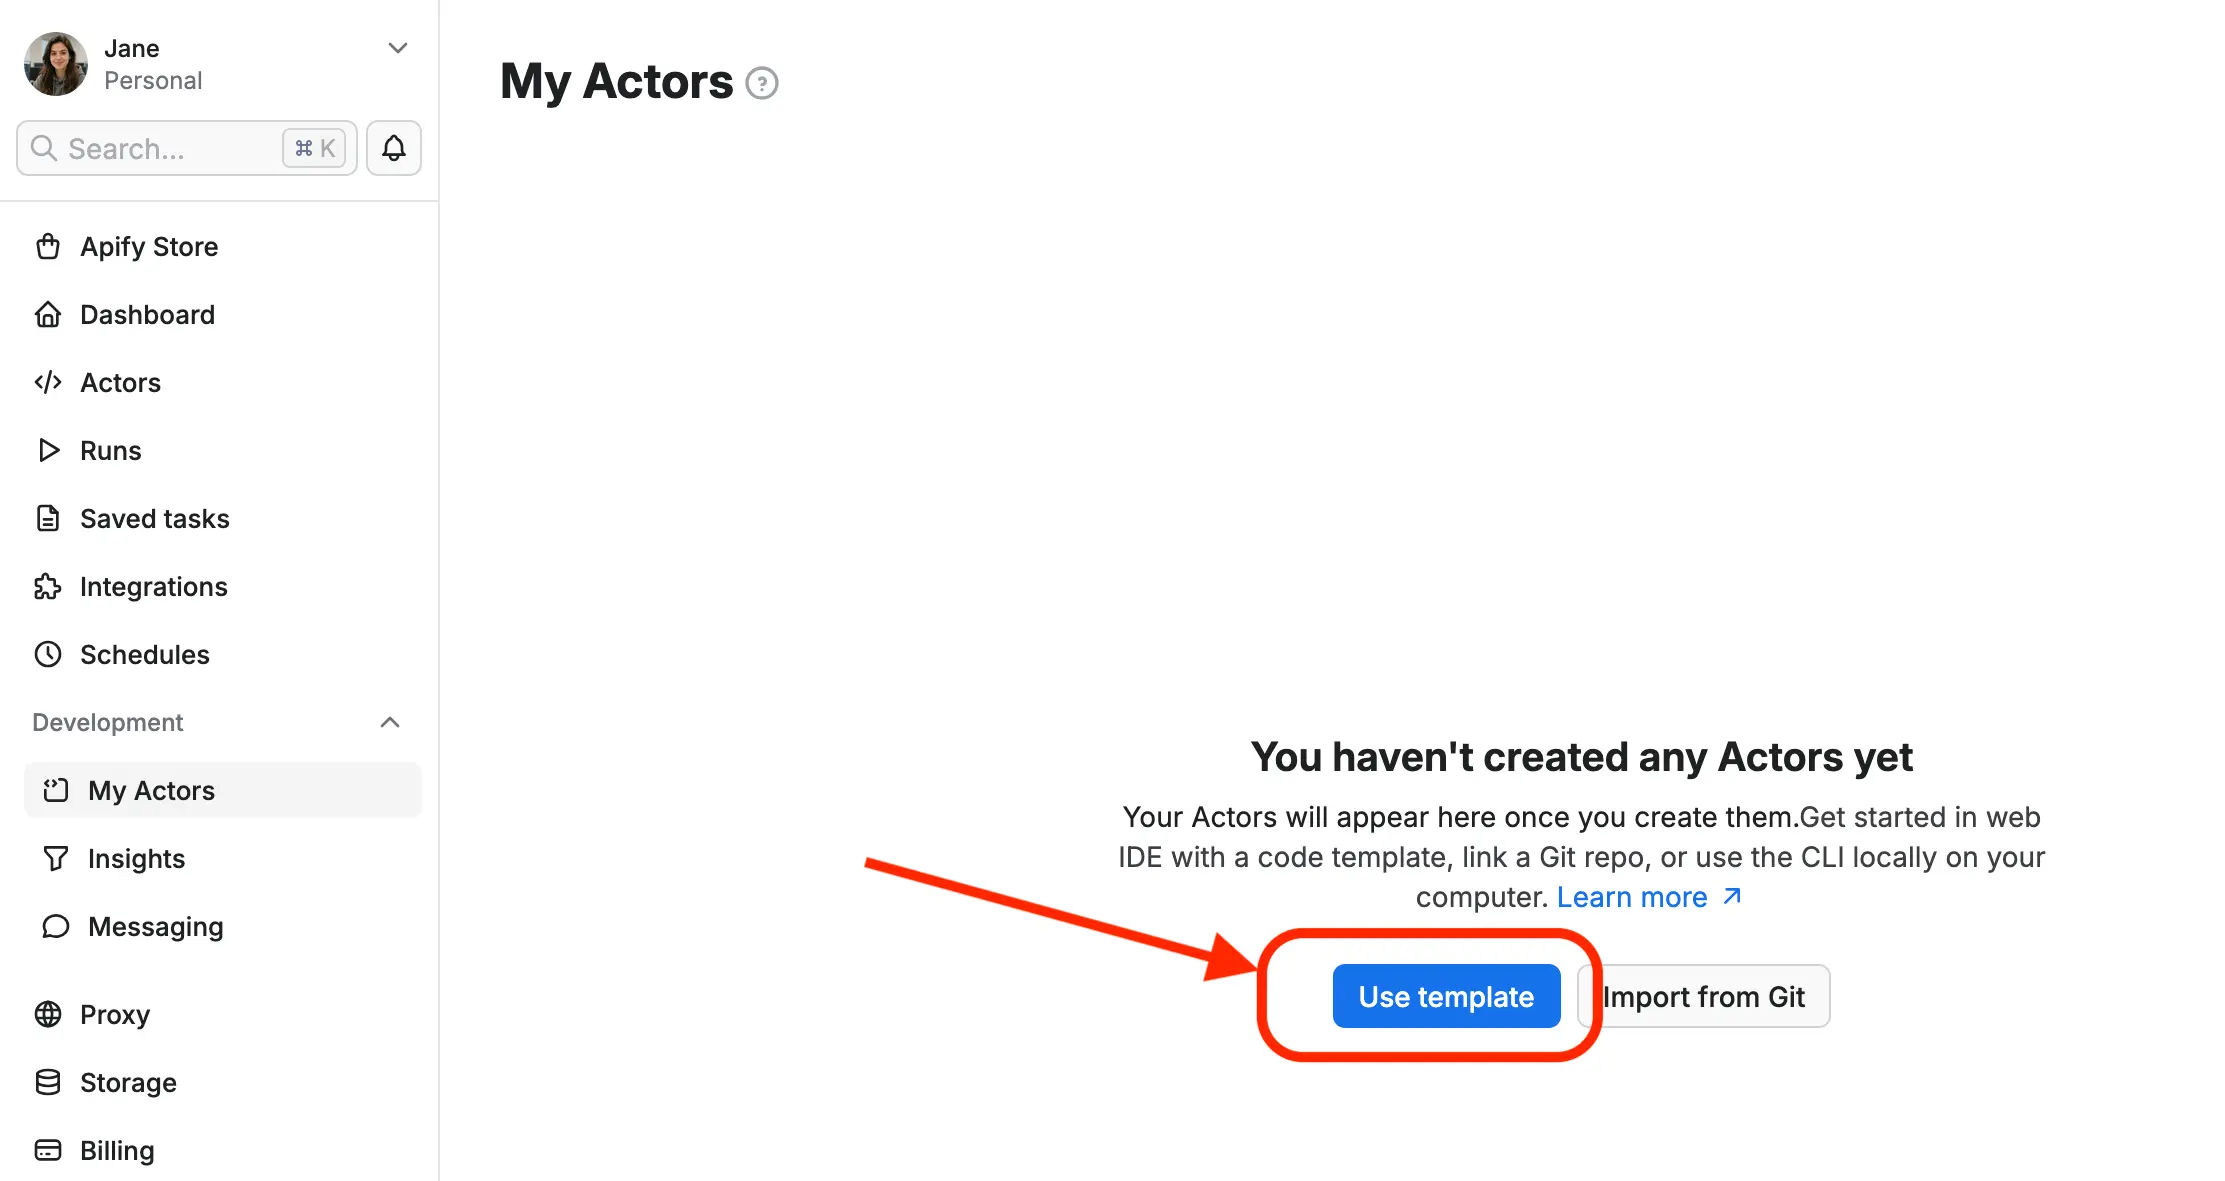
Your phone runs apps, Apify runs Actors. If we want Apify to run something for us, it must be wrapped in the Actor structure. Conveniently, the platform provides ready-made templates we can use. In My Actors, we'll click Use template:
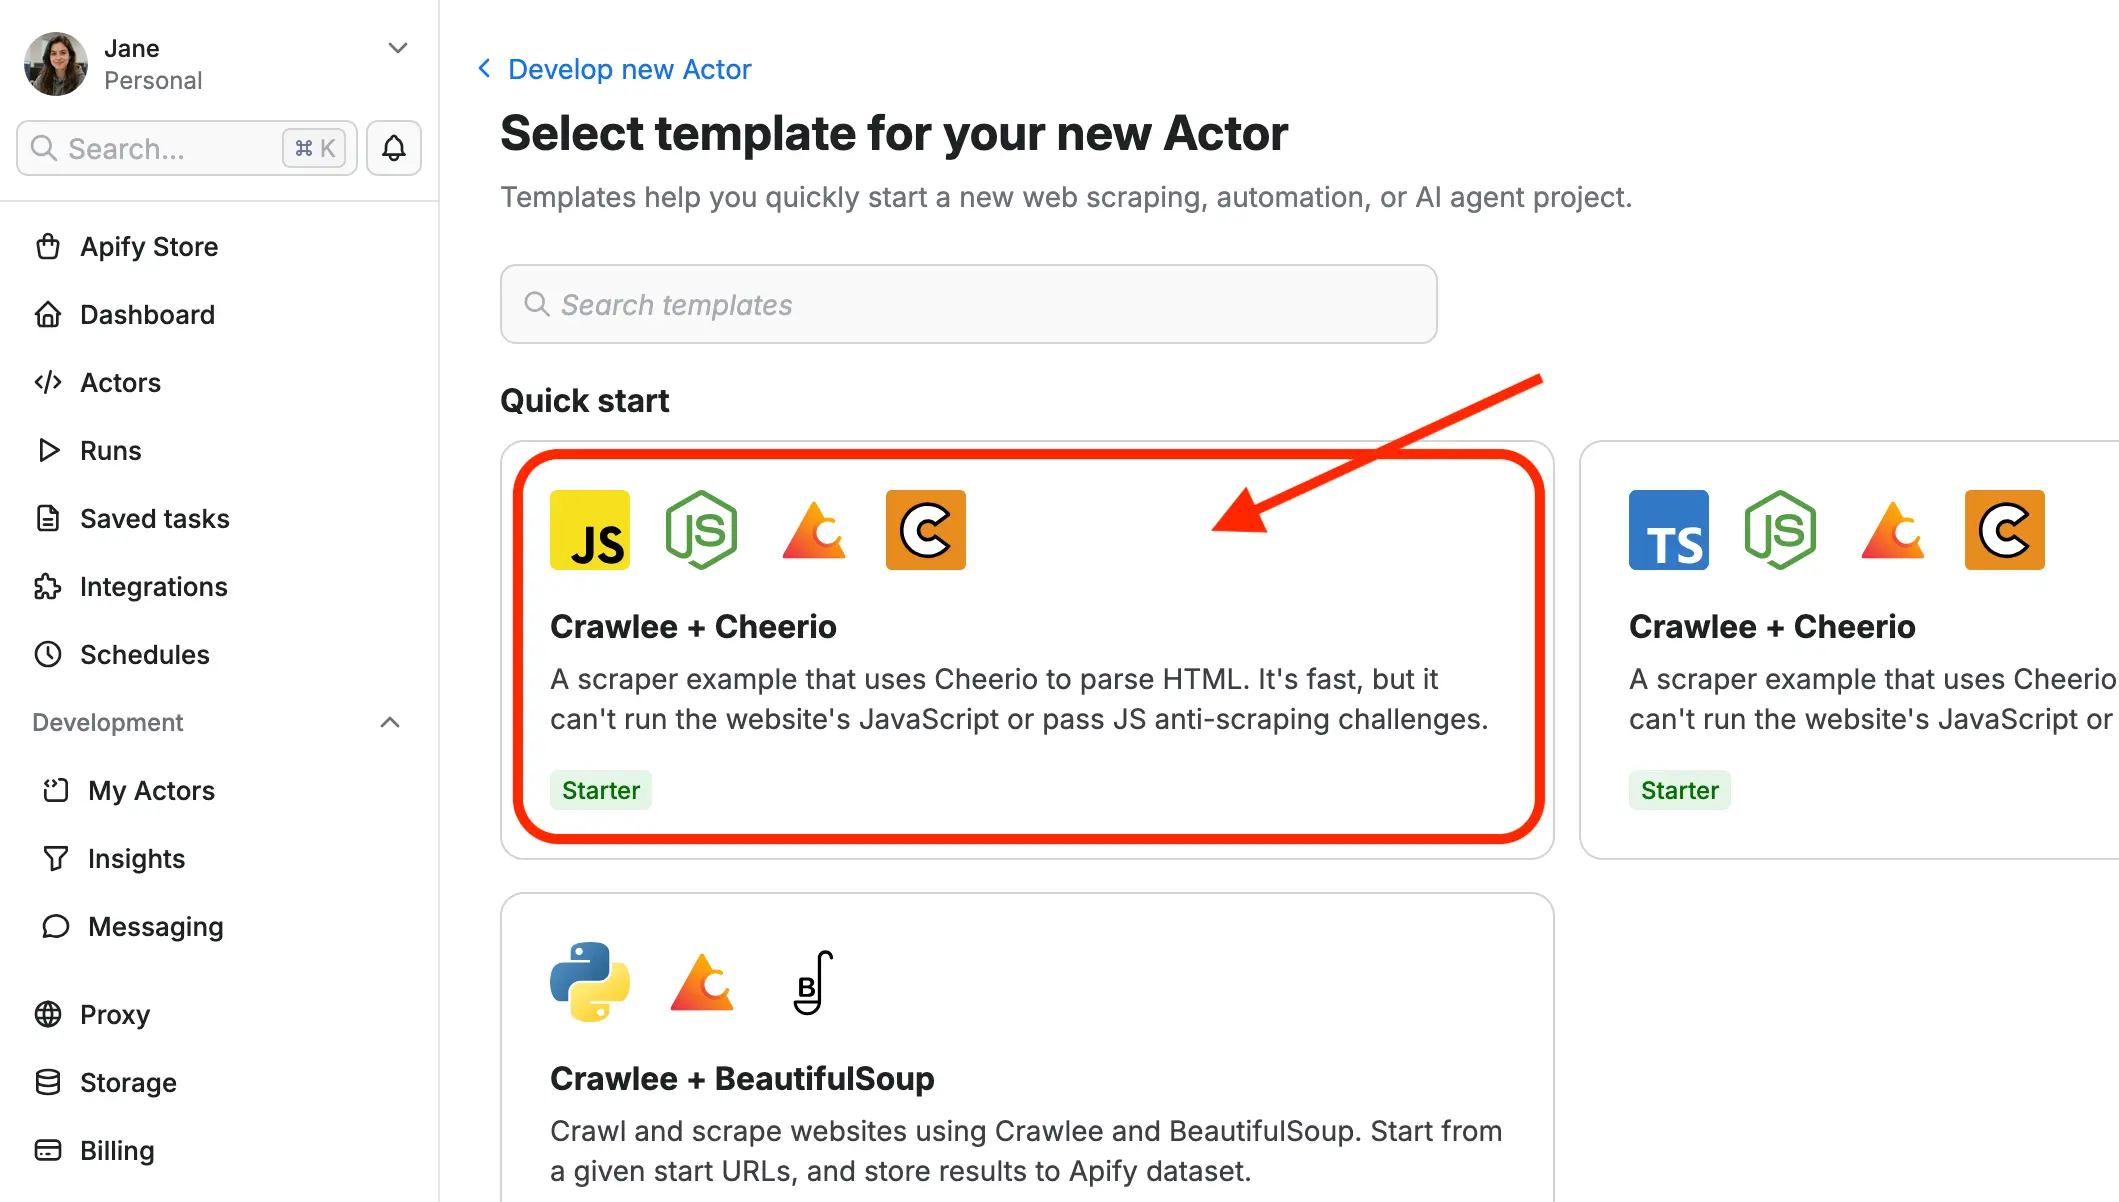
This opens the template selection screen. There are several templates to choose from, each for a different programming language or use case. We'll pick the first template, Crawlee + Cheerio. It has a yellow logo with the letters JS, which stands for JavaScript. That's the programming language our scraper will be written in:
This opens a preview of the template, where we'll confirm our choice:
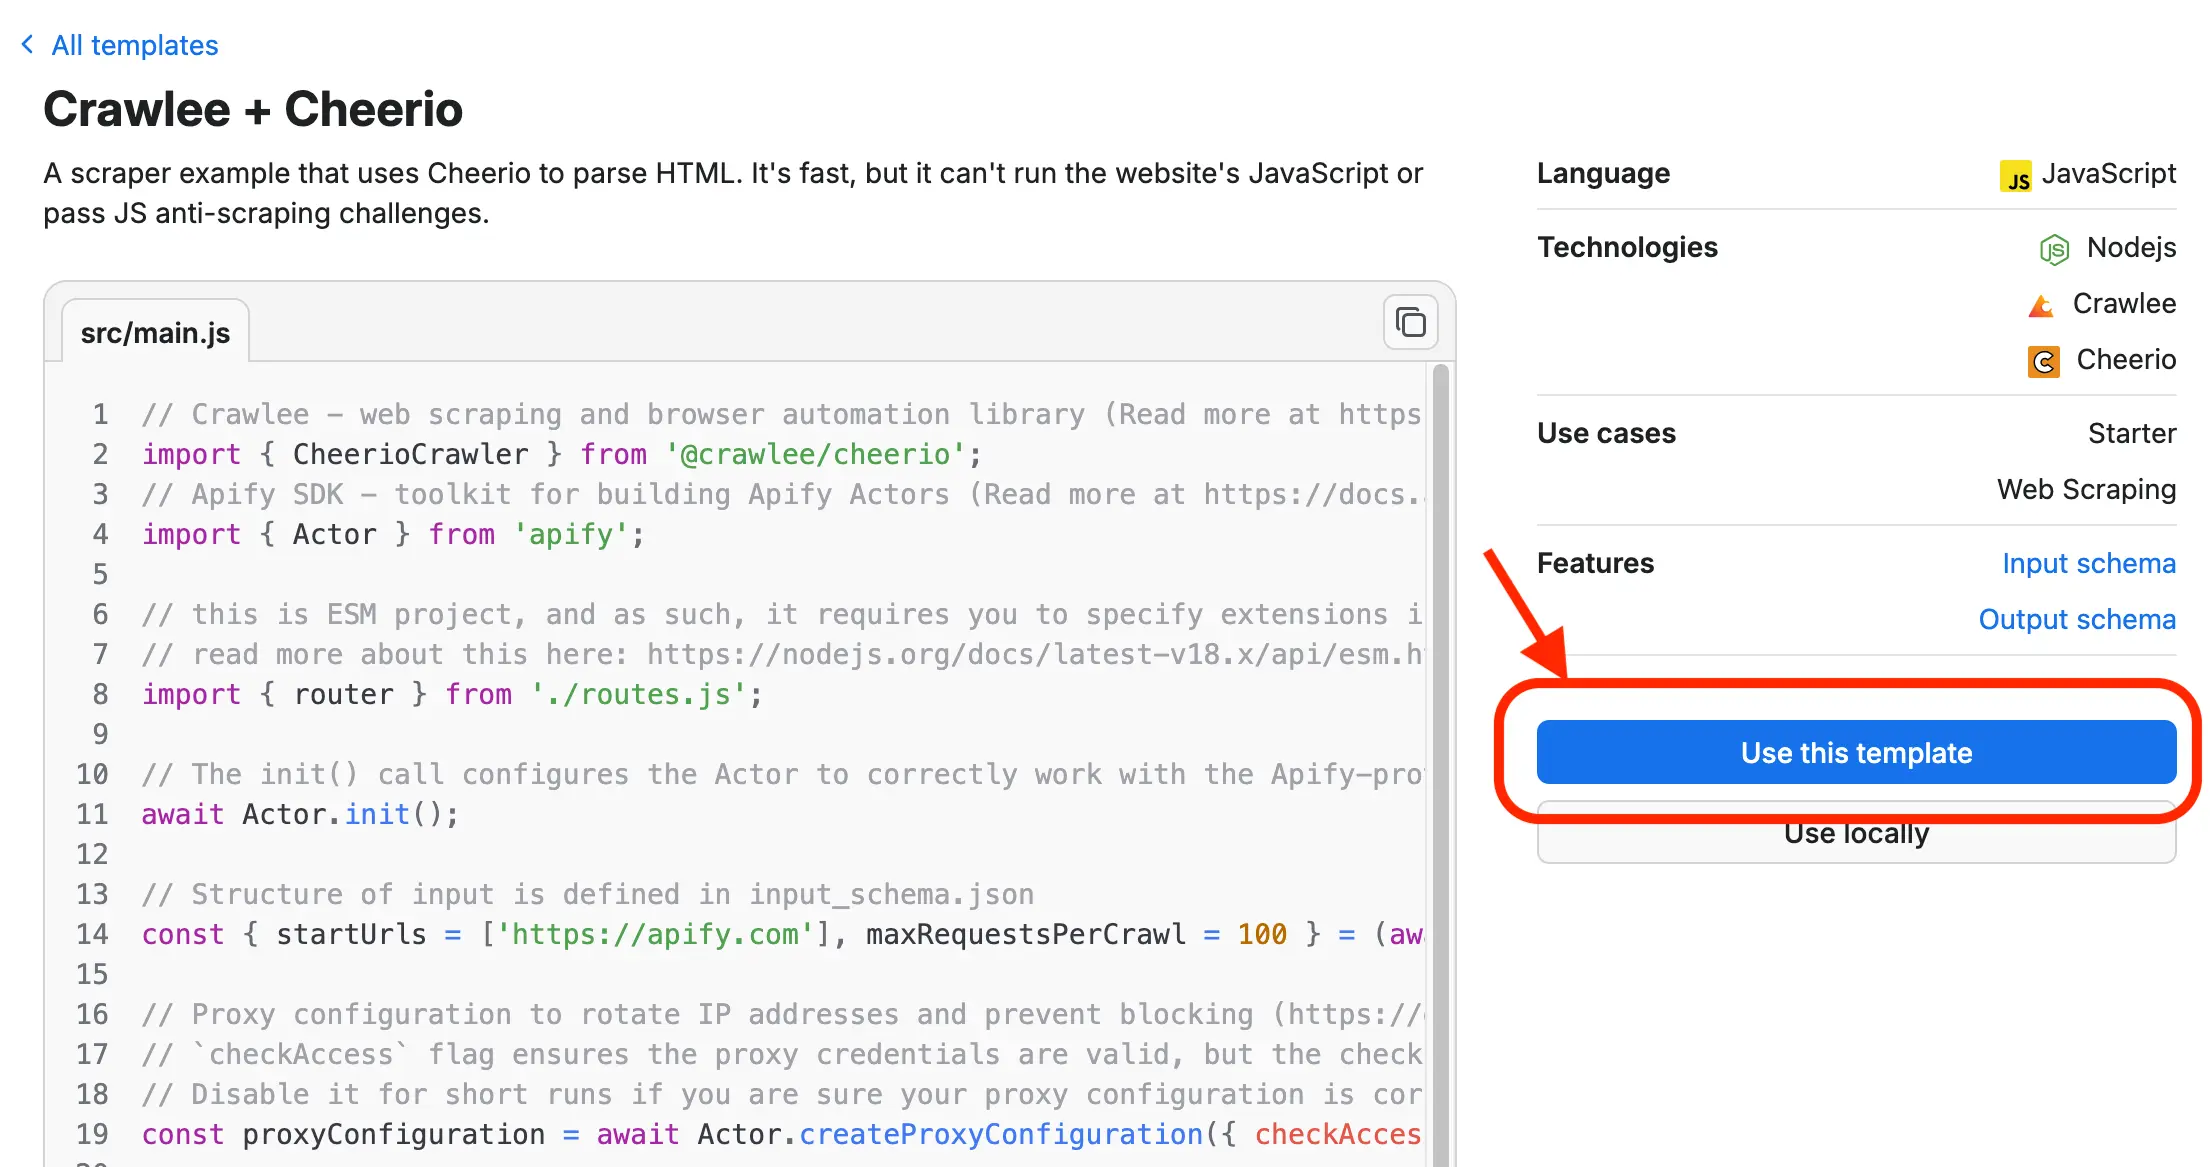
And just like that, we have our first Actor! It's only a sample scraper that walks through a website and extracts page titles, but it's something we can already run, and it'll work.
Running sample Actor
The Actor's detail page has plenty of tabs and settings, but for now we'll stay at Source → Code. That's where the Web IDE is.
IDE stands for integrated development environment. Fear not, it's just jargon for “an app for editing code, somewhat comfortably”. In the Web IDE, we can browse the files the Actor is made of, and change their contents.
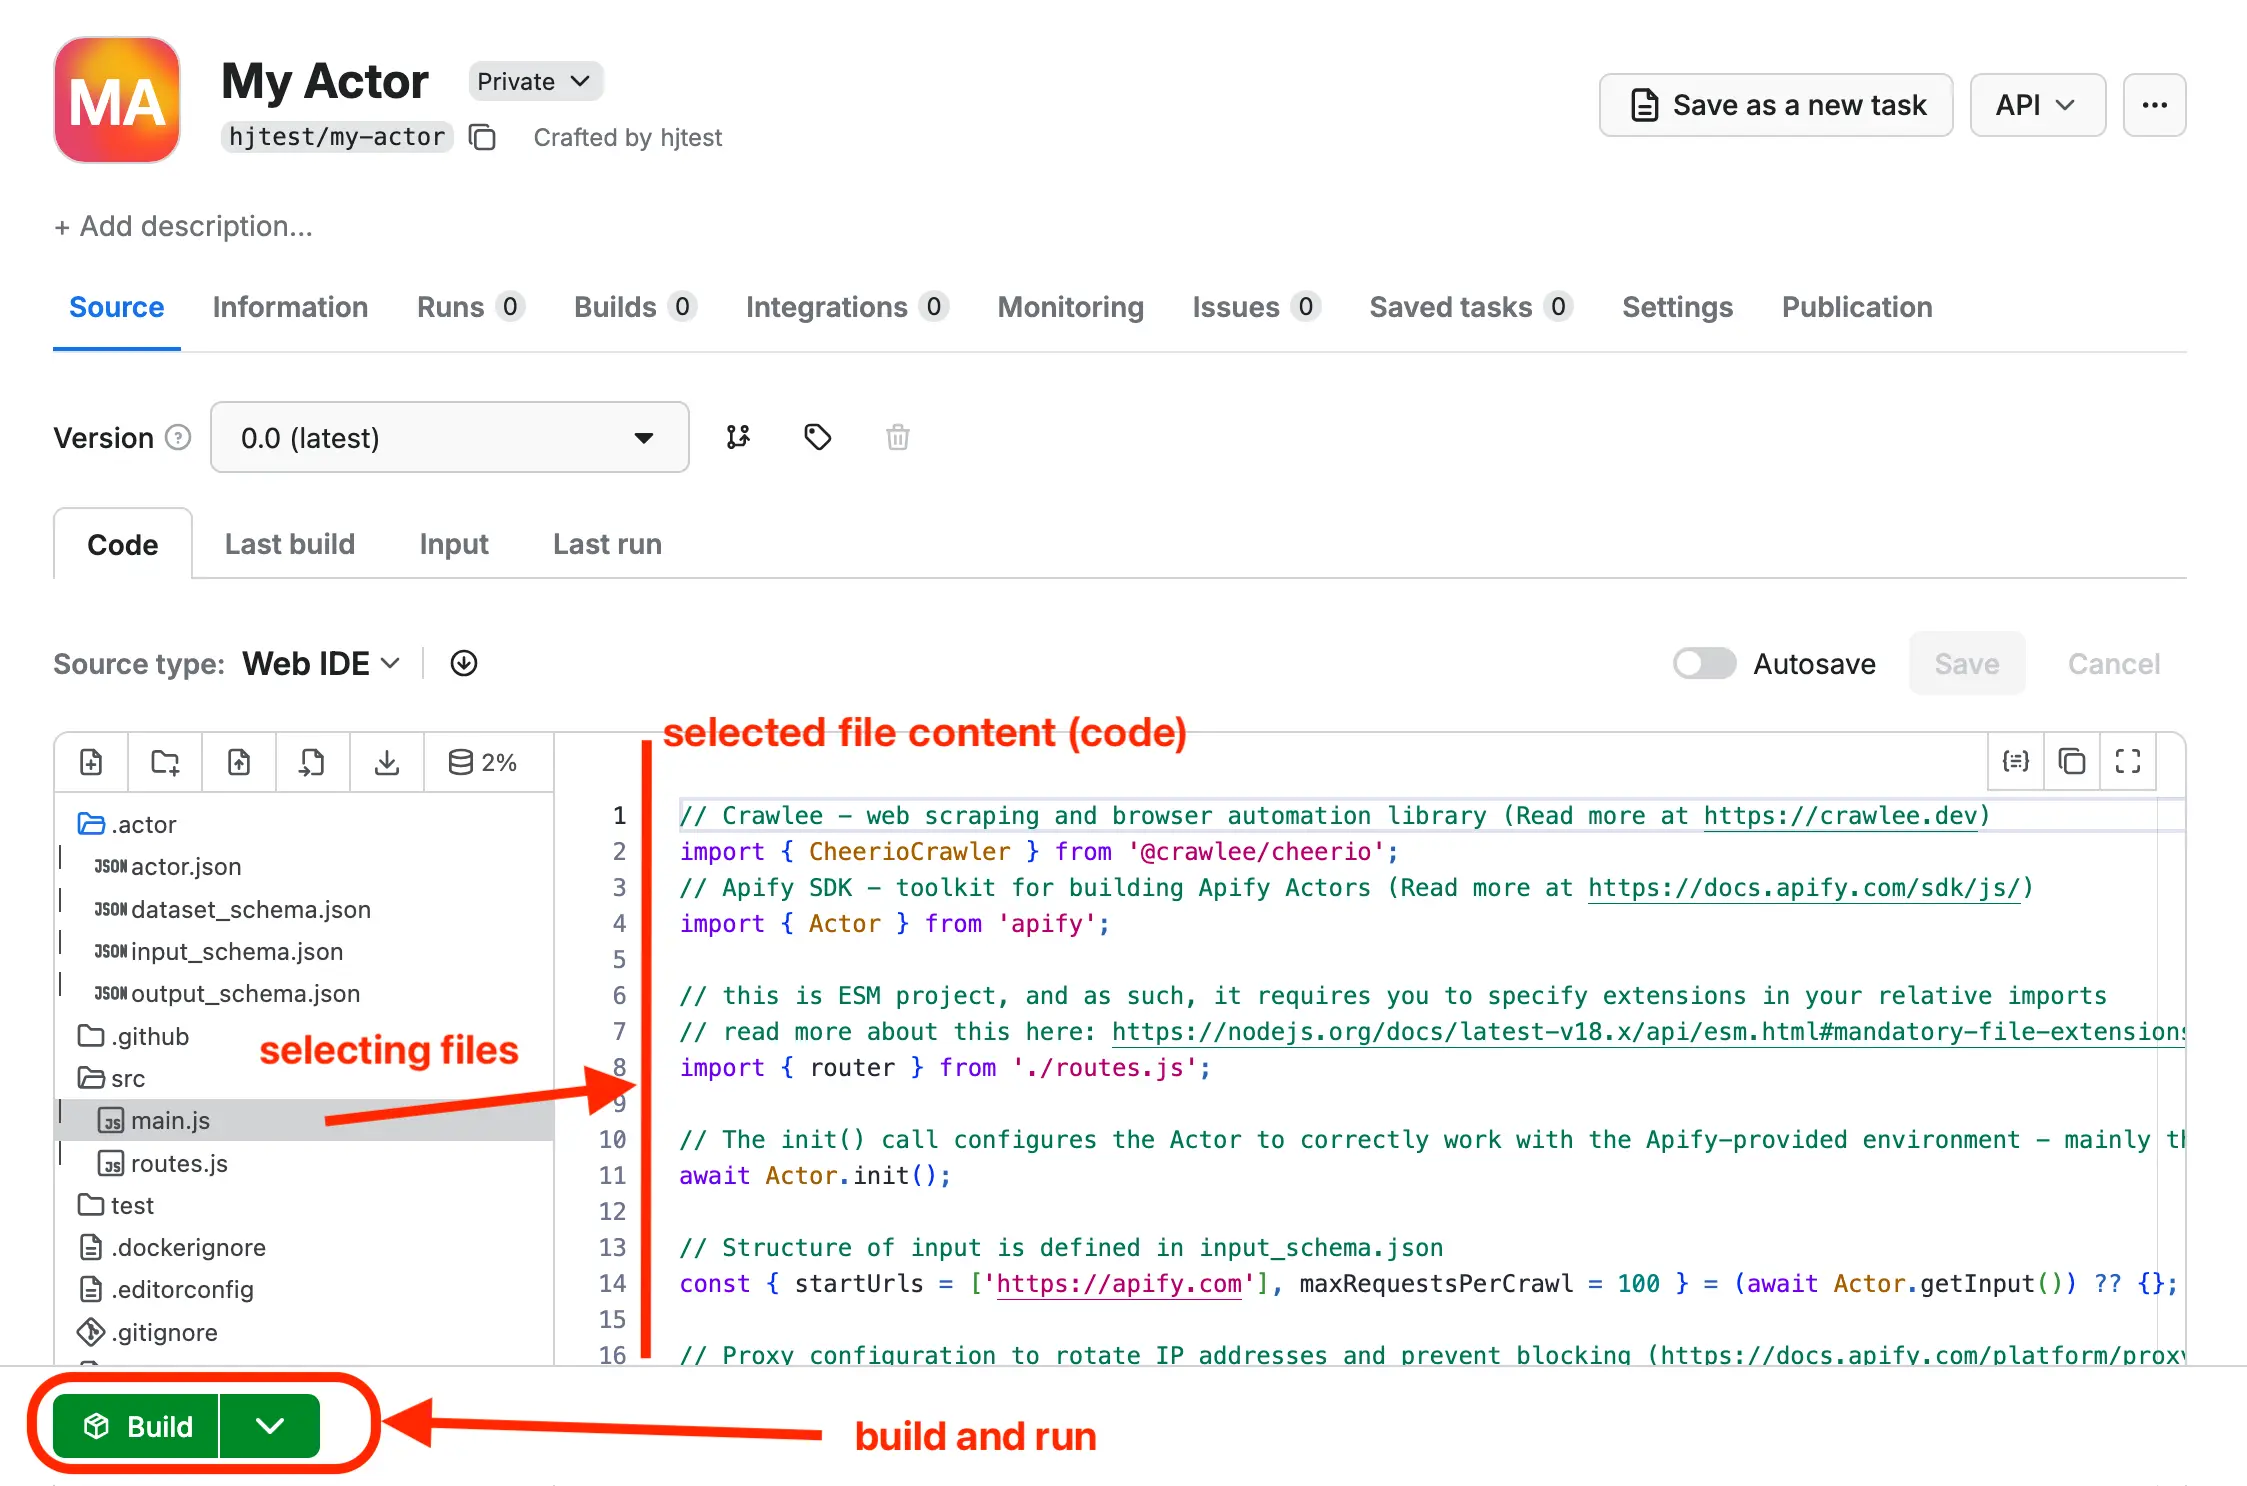
But for now, we'll hold off on changing anything. First, let's check that the Actor works. We'll hit the Build button, which tells the platform to take all the Actor files and prepare the program so we can run it.
The build takes approximately one minute to finish. When done, the button becomes a Start button. Finally, we are ready. Let's press it!
The scraper starts running, and after another short wait, the first rows start to appear in the output table.
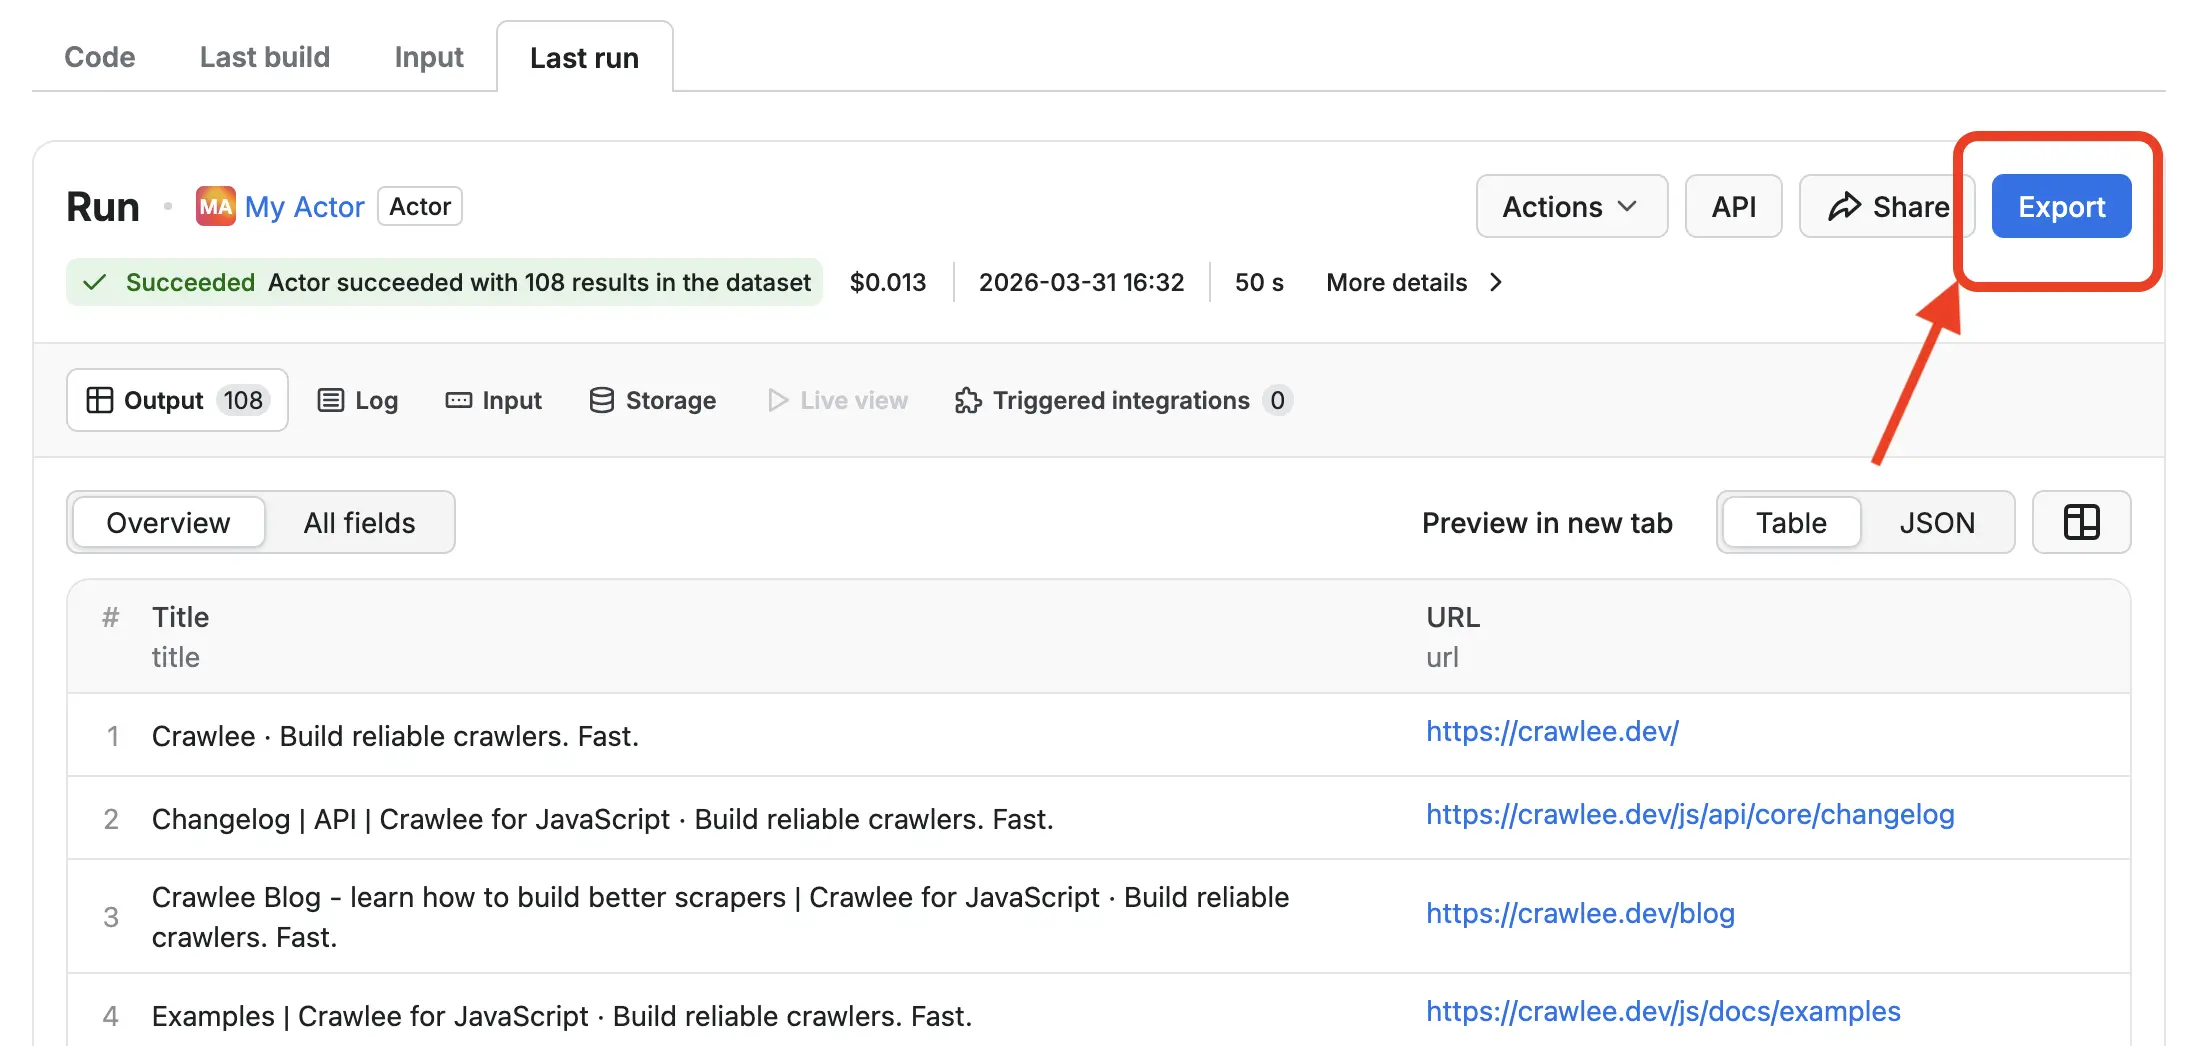
In the end, we should get around 100 results, which we can immediately export to several formats suitable for data analysis, including those which MS Excel or Google Sheets can open.
Modifying the code with ChatGPT
Of course, we don't want page titles. We want a scraper that tracks e-commerce prices. Let's prompt ChatGPT to change the code so that it scrapes the Sales page.
In this course, we'll scrape a real e-commerce site instead of artificial playgrounds or sandboxes. Shopify, a major e-commerce platform, has a demo store at warehouse-theme-metal.myshopify.com. It strikes a good balance between being realistic and stable enough for a tutorial.
We'll open New chat in ChatGPT and prepare a beginning of a prompt like this:
I'm building an Apify Actor that will run on the Apify platform. I need to modify a sample template project so it downloads https://warehouse-theme-metal.myshopify.com/collections/sales, extracts all products in Sales, and returns data with the following information for each product:

- Product name
- Product detail page URL
- Price

Before the program ends, it should log how many products it collected. Code from routes.js follows. Reply with a code block containing a new version of that file.
Now let's switch back to Apify. In Source → Code, where we have the Web IDE, we'll select a file called routes.js inside the src folder. We'll see code similar to this:
import { createCheerioRouter } from '@crawlee/cheerio';

export const router = createCheerioRouter();

router.addDefaultHandler(async ({ enqueueLinks, request, $, log, pushData }) => {
    log.info('enqueueing new URLs');
    await enqueueLinks();

    // Extract title from the page.
    const title = $('title').text();
    log.info(`${title}`, { url: request.loadedUrl });

    // Save url and title to Dataset - a table-like storage.
    await pushData({ url: request.loadedUrl, title });
});
We'll select the full contents of the routes.js file and copy them to our clipboard. Then we'll use Shift+↵ to add a few empty lines and paste the copied code.
After we submit it, ChatGPT should return a large code block with a new version of routes.js. We'll copy it, switch back to the Web IDE, and replace the original routes.js content.
And that's it, our scraper is ready!
Changing Actor input
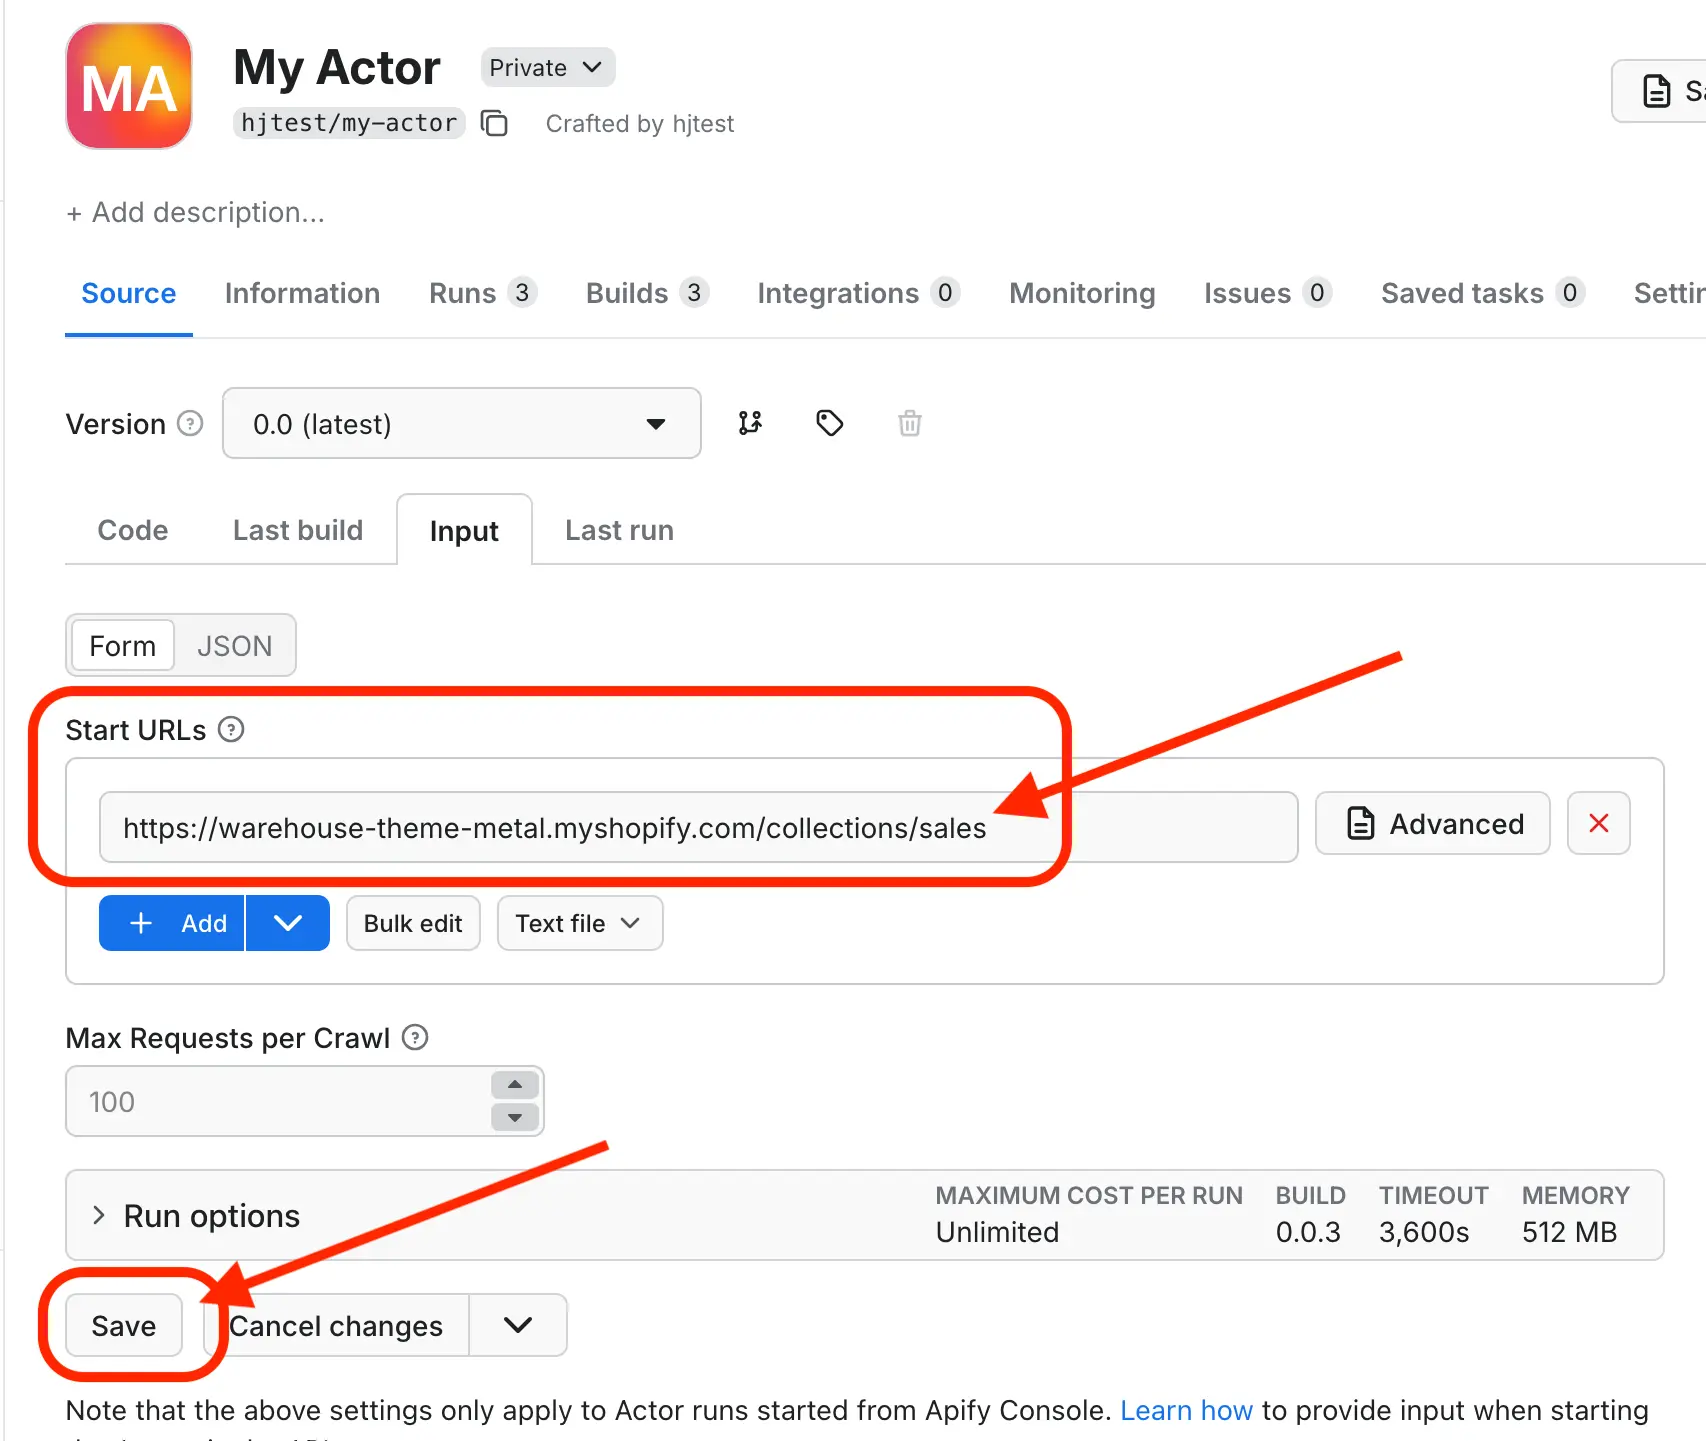
Almost ready… Before we test whether the new code works, we should also change what the Actor takes as input. The sample scraper walked through whatever website it got in the Start URLs input field, but we want our new scraper to use the Warehouse store Sales URL:
https://warehouse-theme-metal.myshopify.com/collections/sales
Let's navigate through the tabs to Source → Input, change the URL, and click the Save button, which is somewhat hidden below the form:
Now we're finally all set.
Scraping products
After our changes, the main button we previously used for building and running conveniently became a Save, Build & Start button. Let's press it and see what happens!
Our project will automatically go through all phases, and then, in a minute or so, we should see the results appearing in the output area.
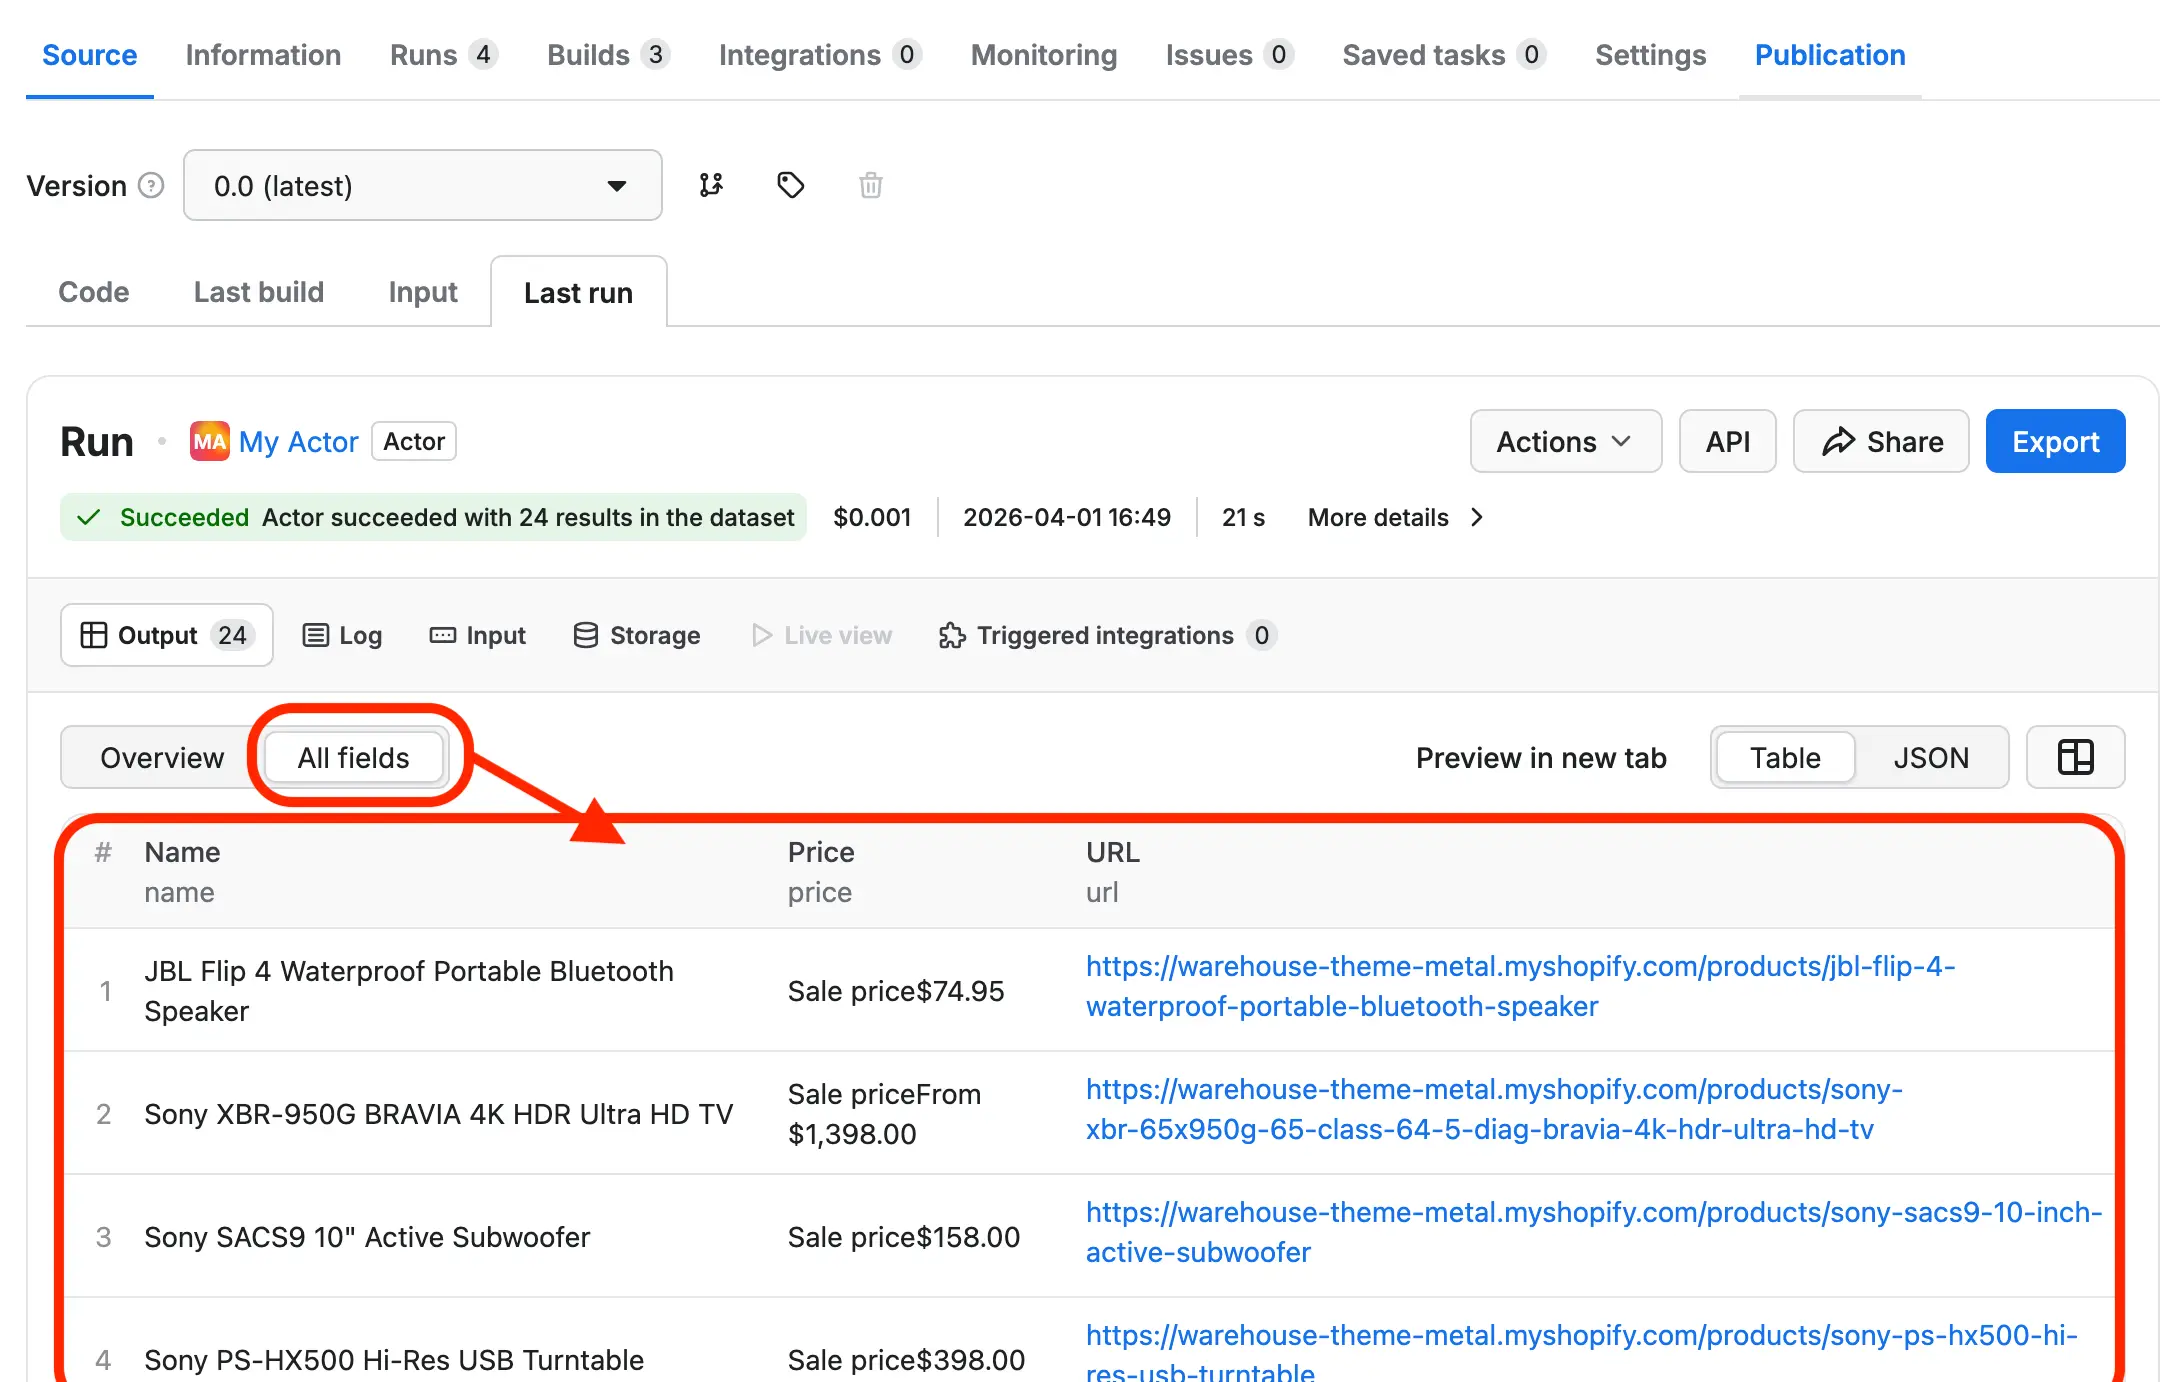
At this point, we haven't told the platform much about the data we expect, so the Overview pane lists only product URLs. But if we go to All fields, we'll see that it really scraped everything we asked for:
| name | url | price |
|---|---|---|
| JBL Flip 4 Waterproof Portable Bluetooth Speaker | https://warehouse-theme-metal.myshopify.com/products/jbl-flip-4-waterproof-portable-bluetooth-speaker | Sale price$74.95 |
| Sony XBR-950G BRAVIA 4K HDR Ultra HD TV | https://warehouse-theme-metal.myshopify.com/products/sony-xbr-65x950g-65-class-64-5-diag-bravia-4k-hdr-ultra-hd-tv | Sale priceFrom $1,398.00 |
| Sony SACS9 10" Active Subwoofer | https://warehouse-theme-metal.myshopify.com/products/sony-sacs9-10-inch-active-subwoofer | Sale price$158.00 |
…and so on. Looks good!
Well, does it? If we look closely, the prices include extra text, which isn't ideal. We'll improve this in the next lesson.
If the scraper doesn't produce any rows, make sure you changed the input URL and applied all code changes.
If that doesn't help, check the Log next to Output. You can copy the whole log, paste it into ChatGPT, and let it figure out what went wrong.
If you're still stuck, open a clean new chat in ChatGPT and try the same prompt for routes.js again.
Wrapping up
Despite a few flaws, we've successfully created our first working prototype of a price-watching app with no coding knowledge.
And thanks to Apify, our scraper can run automatically on a weekly basis, we have its output ready to download in a variety of formats, we can monitor its runs, and we can work around anti-scraping measures.
To improve our project further, we'd copy the code, ask ChatGPT to refine it, paste it back into the Web IDE, and rebuild.
Sounds tedious? In the next lesson, we'll take a look at how we can get the Actor code onto our computer and use the Cursor IDE with a built-in AI agent instead of the Web IDE, so we can develop our scraper faster and with less back-and-forth.