Managing Actor inputs and outputs
Learn to accept input into your Actor, process it, and return output. This concept applies to Actors in any language.
Most of the time when you're creating a project, you are expecting some sort of input from which your software will run off. Oftentimes as well, you want to provide some sort of output once your software has completed running. Apify provides a convenient way to handle inputs and deliver outputs.
Understanding inputs and outputs is essential because they are read/written differently depending on where the Actor is running:
-
If your Actor is running locally, the inputs/outputs are usually provided in the filesystem, and environment variables are injected either by you, the developer, or by the Apify CLI by running the project with the
apify runcommand. -
While running in a Docker container on the platform, environment variables are automatically injected, and inputs & outputs are provided and modified using Apify's REST API.
A bit about storage
You can read/write your inputs/outputs: to the key-value store, or to the dataset. The key-value store can be used to store any sort of unorganized/unrelated data in any format, while the data pushed to a dataset typically resembles a table with columns (fields) and rows (items). Each Actor's run is allocated both a default dataset and a default key-value store.
When running locally, these storages are accessible through the storage folder within your project's root directory, while on the platform they are accessible via Apify's API.
Accepting input
You can utilize multiple ways to accept input into your project. The option you go with depends on the language you have written your project in. If you are using Node.js for your repo's code, you can use the apify package. Otherwise, you can use the useful environment variables automatically set up for you by Apify to write utility functions which read the Actor's input and return it.
Accepting input with the Apify SDK
Since we're using Node.js, let's install the apify package by running the following command:
npm install apify
Now, let's import Actor from apify and use the Actor.getInput() function to grab our input.
// index.js
import { Actor } from 'apify';

// We must initialize and exit the Actor. The rest of our code
// goes in between these two.
await Actor.init();

const input = await Actor.getInput();
console.log(input);

await Actor.exit();
If we run this right now, we'll see null in our terminal - this is because we never provided any sort of test input, which should be provided in the default key-value store. The Actor.getInput() function has detected that there is no storage folder and generated one for us.
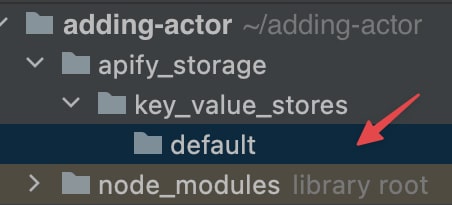
We'll now add an INPUT.json file within storage/key_value_stores/default to match what we're expecting in our code.
{
    "numbers": [5, 5, 5, 5]
}
Then we can add our example project code from earlier. It will grab the input and use it to generate a solution which is logged into the console.
// index.js
import { Actor } from 'apify';

await Actor.init();

const { numbers } = await Actor.getInput();

const addAllNumbers = (...nums) => nums.reduce((total, curr) => total + curr, 0);

const solution = addAllNumbers(...numbers);

console.log(solution);

await Actor.exit();
Cool! When we run node index.js, we see 20.
Accepting input without the Apify SDK
Alternatively, when writing in a language other than JavaScript, we can create our own get_input() function which utilizes the Apify API when the Actor is running on the platform. For this example, we are using the Apify Client for Python to access the API.
# index.py
import json
from os import environ
from apify_client import ApifyClient

client = ApifyClient(token='YOUR_TOKEN')

# If being run on the platform, the "APIFY_IS_AT_HOME" environment variable
# will be "1". Otherwise, it will be undefined/None
def is_on_apify():
    return 'APIFY_IS_AT_HOME' in environ

# Get the input
def get_input():
    if not is_on_apify():
        with open('./apify_storage/key_value_stores/default/INPUT.json') as actor_input:
            return json.load(actor_input)

    kv_store = client.key_value_store(environ.get('APIFY_DEFAULT_KEY_VALUE_STORE_ID'))
    return kv_store.get_record('INPUT')['value']

def add_all_numbers(nums):
    total = 0

    for num in nums:
        total += num

    return total

actor_input = get_input()['numbers']
solution = add_all_numbers(actor_input)
print(solution)
For a better understanding of the API endpoints for reading and modifying key-value stores, check the official API reference.
Writing output
An Actor's results generally go into its storages - a dataset, key-value store, or request queue. Similarly to reading input, you can write them either by using the Apify SDK in Node.js or by manually writing a utility function to do so.
Writing output with the Apify SDK
In the SDK, we can write to the dataset with the Actor.pushData() function. Let's go ahead and write the solution of the addAllNumbers() function to the dataset store using this function:
// index.js

// This is our example project code from earlier.
// We will use the Apify input as its input.
import { Actor } from 'apify';

await Actor.init();

const { numbers } = await Actor.getInput();

const addAllNumbers = (...nums) => nums.reduce((total, curr) => total + curr, 0);

const solution = addAllNumbers(...numbers);

// And save its output to the default dataset
await Actor.pushData({ solution });

await Actor.exit();
Writing output without the Apify SDK
Just as with the custom get_input() utility function, you can write a custom set_output() function as well if you cannot use the Apify SDK.
You can read and write your output anywhere; however, it is standard practice to use a folder named storage.
# index.py
import json
from os import environ
from apify_client import ApifyClient

client = ApifyClient(token='YOUR_TOKEN')

def is_on_apify():
    return 'APIFY_IS_AT_HOME' in environ

def get_input():
    if not is_on_apify():
        with open('./apify_storage/key_value_stores/default/INPUT.json') as actor_input:
            return json.load(actor_input)

    kv_store = client.key_value_store(environ.get('APIFY_DEFAULT_KEY_VALUE_STORE_ID'))
    return kv_store.get_record('INPUT')['value']

# Push the solution to the dataset
def set_output(data):
    if not is_on_apify():
        with open('./apify_storage/datasets/default/solution.json', 'w') as output:
            return output.write(json.dumps(data, indent=2))

    dataset = client.dataset(environ.get('APIFY_DEFAULT_DATASET_ID'))
    dataset.push_items([json.dumps(data, indent=4)])

def add_all_numbers(nums):
    total = 0

    for num in nums:
        total += num

    return total

actor_input = get_input()['numbers']
solution = add_all_numbers(actor_input)
set_output({'solution': solution})
Testing locally
Since we've changed our code a lot from the way it originally was by wrapping it in the Apify SDK to accept inputs and return outputs, we most definitely should test it locally before worrying about pushing it to the Apify platform.
After running our script, there should be a single item in the default dataset that looks like this:
{
    "solution": 20
}
Next up
That's it! We've now added all of the files and code necessary to convert our software into an Actor. In the next lesson, we'll be learning how to generate a user interface for our Actor's input so that users don't have to provide the input in raw JSON format.