How to write Actor input schema
Learn to define your Actor's input UI on the Apify platform with an INPUT_SCHEMA.json file stored inside the .actor configuration directory.
Writing an input schema for an Actor is optional, but recommended. The Apify platform reads input schema and generates a user interface for entering input into your Actor, which makes it easier for non-developers and developers alike to configure and understand the inputs your Actor accepts. Because of this, we'll write an input schema for our example Actor.
Without an input schema, the users of our Actor will have to provide the input in JSON format, which can be problematic for those who are not familiar with JSON.
Schema title & description
Inside the .actor directory at the root of our project, we'll create INPUT_SCHEMA.json and start writing the first part of the schema.
Create a .actor directory at the root of your project. It holds your Actor's configuration: actor.json, INPUT_SCHEMA.json, Dockerfile, and README.md. See Actor definition for the full reference.
{
"title": "Adding Actor input",
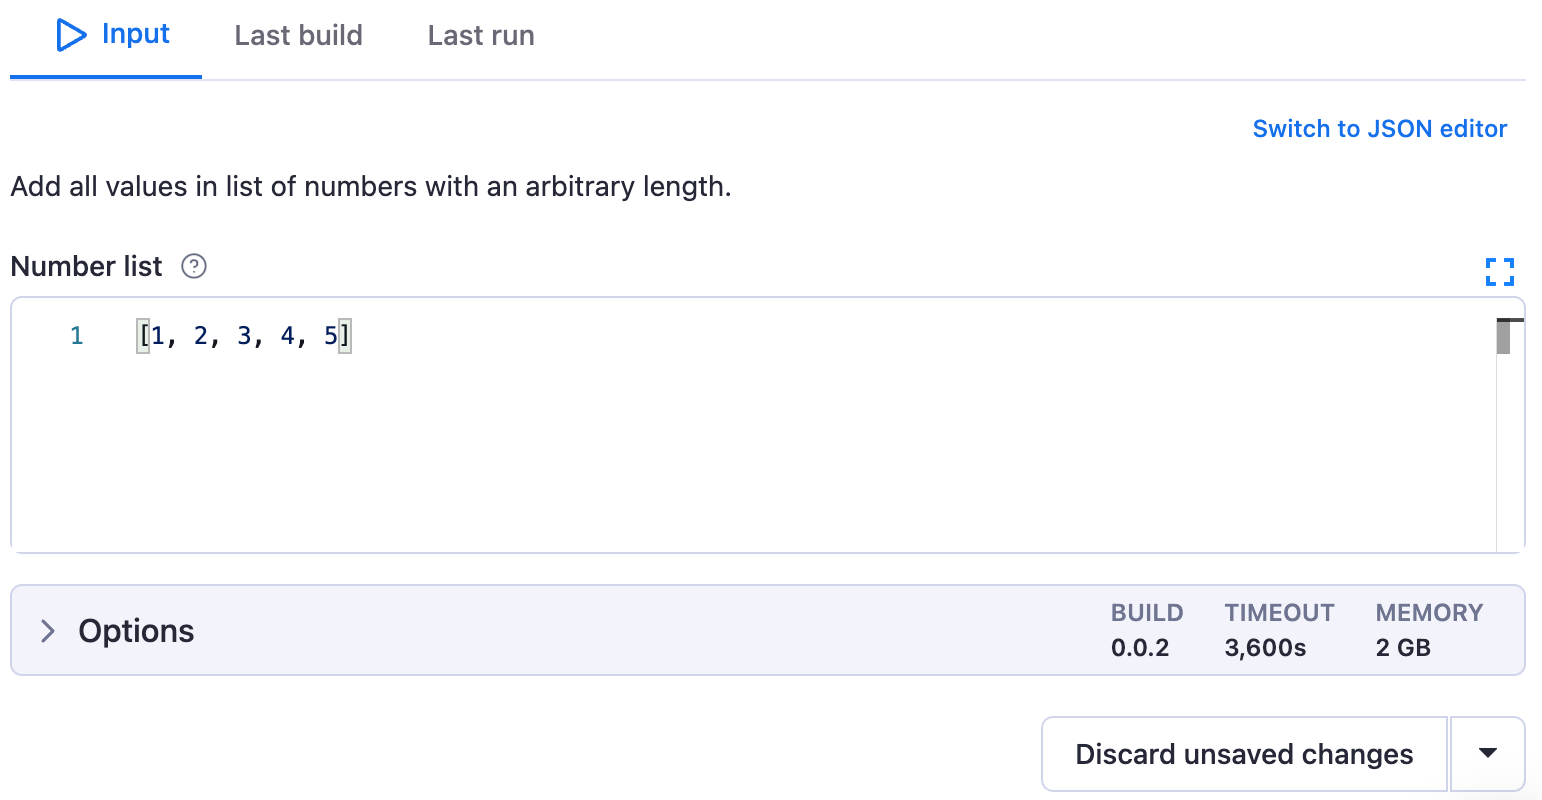
"description": "Add all values in list of numbers with an arbitrary length.",
"type": "object",
"schemaVersion": 1
}
The title and description describe what the input schema is for, and a bit about what the Actor itself does.
Properties
In order to define all of the properties our Actor is expecting, we must include them within an object with a key of properties.
{
    "title": "Adding Actor input",
    "description": "Add all values in list of numbers with an arbitrary length.",
    "type": "object",
    "schemaVersion": 1,
    "properties": {
        "numbers": {
            "title": "Number list",
            "description": "The list of numbers to add up."
        }
    }
}
Each property's key corresponds to the name we're expecting within our code, while the title and description are what the user will see when configuring input on the platform.
Property types & editor types
Within our new numbers property, there are two more fields we must specify. Firstly, we must let the platform know that we're expecting an array of numbers with the type field. Then, we should also instruct Apify on which UI component to render for this input property. In our case, we have an array of numbers, which means we should use the json editor type that we discovered in the "array" section of the input schema documentation. We could also use stringList, but then we'd have to parse out the numbers from the strings.
{
    "title": "Adding Actor input",
    "description": "Add all values in list of numbers with an arbitrary length.",
    "type": "object",
    "schemaVersion": 1,
    "properties": {
        "numbers": {
            "title": "Number list",
            "description": "The list of numbers to add up.",
            "type": "array",
            "editor": "json"
        }
    }
}
Required fields
The great thing about building an input schema is that it will automatically validate your inputs based on their type, maximum value, minimum value, etc. Sometimes, you want to ensure that the user will always provide input for certain fields, as they are crucial to the Actor's run. This can be done by using the required field and passing in the names of the fields you'd like to require.
{
    "title": "Adding Actor input",
    "description": "Add all values in list of numbers with an arbitrary length.",
    "type": "object",
    "schemaVersion": 1,
    "properties": {
        "numbers": {
            "title": "Number list",
            "description": "The list of numbers to add up.",
            "type": "array",
            "editor": "json"
        }
    },
    "required": ["numbers"]
}
For our case, we've made the numbers field required, as it is crucial to our Actor's run.
Final thoughts
Here is what the input schema we wrote will render on the platform:
Later on, we'll be building more complex input schemas, as well as discussing how to write quality input schemas that allow the user to understand the Actor.
It's not expected to memorize all of the fields that properties can take or the different editor types available, which is why it's always good to reference the input schema documentation when writing a schema.
Next up
In the next lesson, we'll learn how to generate an appealing Overview table to display our Actor's results in real time, so users can get immediate feedback about the data being extracted.