Adding your RapidAPI project to Apify
If you've published an API project on RapidAPI, you can expand your project's visibility by listing it on Apify Store. This gives you access to Apify's developer community and ecosystem.
Why add your API project to Apify
By publishing your API project on Apify, you'll reach thousands of active users in Apify Store. You'll also get access to the Apify platform's infrastructure: managed hosting, data storage, scheduling, advanced web scraping and crawling capabilities, and integrated proxy management. These tools help you reach more users and enhance your API's functionality.
Step-by-step guide
The approach is demonstrated on an app built on top of Express.js, but with a few adaptations to the code, any API framework will work.
You'll deploy your API as an Apify Actor - a serverless cloud program that runs on the Apify platform. Actors can handle everything from simple automation to running web servers.
Prerequisites
You’ll need an Apify account - it’s free and no credit card is required. For simple migration and deployment, we recommend installing the Apify CLI:
curl -fsSL https://apify.com/install-cli.sh | bash
Check the CLI installation page for more details and all the options.
Step 1: Initialize the Actor structure
Once you have the Apify CLI, run the following command:
apify init
The command sets up an Actor project in your current directory by creating actor.json (Actor configuration) and storage files (Dataset and Key-value store).
Step 2: Add Actor logic
The initialization of the Actor is the first important thing. The second is the correct mapping of the PORT. Check the following example for inspiration:
await Actor.init(); // Initializes the Actor

const app = express();
const PORT = Actor.config.get('containerPort'); // Specifies the PORT
const DATA_FILE = path.join(__dirname, 'data', 'items.json');

app.use(express.json());

// Rest of the logic
The Apify platform performs readiness checks by sending GET requests to / with the x-apify-container-server-readiness-probe header. For better resource efficiency, consider checking for this header and returning a simple response early, rather than processing it as a full request. This optimization is particularly useful for resource-intensive Actors.
app.get('*', (req, res) => {
    if (req.headers['x-apify-container-server-readiness-probe']) {
        console.log('Readiness probe');
        res.send('Hello, readiness probe!\n');
    }
});
Step 3: Test your Actor locally
Once you’ve added the Actor logic, test your Actor locally with the following command:
apify run
Now, check that your server is running. Check one of your endpoints, for example /health.
Step 4: Deploy your Actor to Apify
Now push your Actor to Apify Console. You’ll be able to do this only if you’re logged in to your Apify account with the CLI. Run apify info to check, and if you’re not logged in yet, run apify login. This only needs to be done once. To push your project, run the following command:
apify push
Step 5: Run your Actor
After pushing your Actor to the platform, in the terminal you’ll see an output similar to this:
2025-10-03T07:57:13.671Z ACTOR: Build finished.
Actor build detail https://console.apify.com/actors/a0c...
Actor detail https://console.apify.com/actors/aOc...
Success: Actor was deployed to Apify cloud and built there.
You can click the Actor detail link, or go to Apify Console > My Actors, and click on your Actor. Now, click on the Settings tab, and enable Actor Standby:
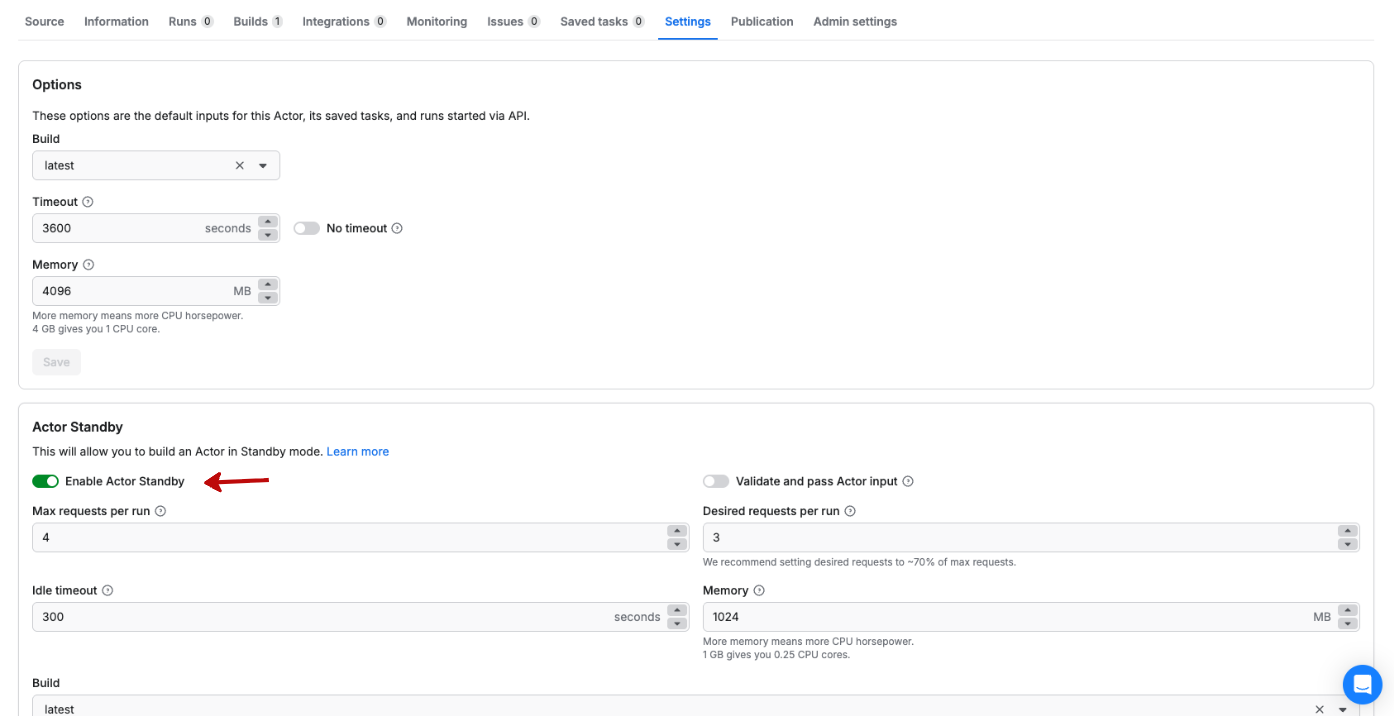
Actors can run in two modes: as batch processing jobs that execute a single task and stop, or in Standby mode as a web server. For use cases like deploying an API that needs to respond to incoming requests in real-time, Standby mode is the best choice. It keeps your Actor running continuously and ready to handle HTTP requests like a standard web server.
Once you’ve saved the settings, go to the Standby tab, and click the Test endpoint button. It will start the Actor, and you can test it. Once the Actor is running, you're done with the migration!
Next steps
Ready to monetize your Actor and start earning? Check out these guides:
You can also extend your Actor with custom logic and leverage additional Apify platform features, such as storage or web scraping capabilities.